Overview
Live Transfers let your assistant automatically transfer a caller to a real phone number based on a specific trigger phrase. You can create up to 50 transfer scenarios per assistant. Transfers can be reused across assistants, or kept specific to one.Transfer Trigger Mode
On the Live Transfer Management page, use Transfer Mode to set how callers can complete a transfer. This is an organization-wide setting—it affects all assistants in your org as soon as you change it.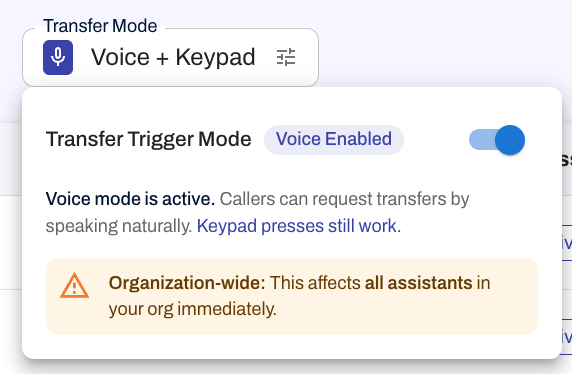
Voice enabled (toggle on)
When Transfer Trigger Mode is on, the UI shows Voice Enabled and Voice + Keypad. You keep the same live transfer scenarios you already built—trigger phrases, numbers, and the rest. What changes is how callers reach them: if someone says something close to a transfer’s trigger phrase, the assistant can connect them without asking them to dial on the keypad. Keypad patterns still work too. That matters when callers cannot easily press buttons—for example, they are driving or otherwise hands-busy.Keypad only (toggle off)
When the toggle is off, transfers use keypad entry only. The assistant directs callers to press the configured keys (for example, press 1 followed by the pound key) using each transfer’s pattern.Spoken name (voice mode only)
When voice is enabled for your organization, each live transfer includes a Spoken name field in the transfer details. This is how the assistant refers to that destination during the call—not the internal Live Transfer Name you use in the dashboard. For example, if the transfer is for your front desk, you might set the spoken name tofront desk. When the assistant transfers the caller, it can say something like “I’m going to transfer you to the front desk.”
The Spoken name field appears only while Transfer Trigger Mode is on (voice enabled) for the org.
Per-assistant setup—trigger phrases, numbers, warm handoff, and reusable transfers—still happens on the Live Transfer Management page below.
Voice transfers require the new phone system. If your assistant has not yet been migrated, the voice toggle may not be available. Contact support if you’d like to be migrated.
Configure Live Transfers
On the Live Transfer Management page, click Add Live Transfer to get started. You’ll see two options:- Create New Live Transfer: Set up a new transfer scenario
- Use Existing Live Transfer: Select a transfer already created for another assistant
Fields Explained
Live Transfer Name
Add a short, descriptive name for this transfer. This is just for your reference in the dashboard.Trigger Phrase
Enter the phrase that the assistant should recognize to initiate the transfer. This might be something like:"I'd like to speak to someone""Talk to an agent""Transfer me to billing"
Trigger phrases are used by the AI to understand intent, not just exact wording.
For example, if you enter a trigger phrase like “speak to an employee,” the assistant will also recognize variations such as “talk to a human” or “get me to a person.”
For example, if you enter a trigger phrase like “speak to an employee,” the assistant will also recognize variations such as “talk to a human” or “get me to a person.”
Transfer Pattern
This is the dial pattern the assistant will use to trigger the transfer. For example:1# means the user will press 1 followed by the pound key.
Transfer Phone Number
The phone number the assistant will transfer the call to. Use a valid 10-digit number.Reusable
Check this box if you want to make this transfer available to other assistants.If you don’t see an existing live transfer that you already created, check to make sure you have the “reusable” checkbox turned on.
Response Message
This is what the assistant will say right after the trigger phrase is detected and the transfer begins.Example:
Press 1 followed by the pound key to be transferred.
Warm Transfers
Warm transfers allow your assistant to brief the person receiving the call before or after they connect with the caller. This reduces the need for customers to repeat themselves and makes handoffs feel seamless. You can configure warm transfer behavior in the settings for each live transfer. When creating or editing a transfer, choose Warm Handoff under Transfer Type.Staff Briefing (Whisper)
Only the person receiving the call hears a message before the caller connects. The caller does not hear this. You can choose between:- Static — a fixed message that plays every time (e.g., “Transferring a caller from AI assistant”)
- AI-Generated — a prompt that tells the AI what to say, such as “Summarize the conversation quickly, in less than 2 sentences, focusing on what is important for the staff member to know to assist the customer”
Post-Connection Message
Both the caller and the receiving person hear a message after the call connects. This is useful when transparency is preferred. You can choose between:- Static — a fixed message (e.g., “You are now connected”)
- AI-Generated — a prompt for the AI to generate a contextual message
Combination
You can use a whisper and a post-connection message together — for example, an AI-generated briefing whispered privately to the staff member, followed by a static “You are now connected” message for both parties.Hold Experience
Choose what the caller hears while waiting to be connected during a warm transfer. Options include a ringing tone, hold music, or silence.Seconds Before Voicemail Starts
Optionally set a time limit for how long the transfer rings before the call goes to voicemail.Warm transfers require the new phone system. If your assistant has not yet been migrated, warm transfers will not be available. Contact support if you’d like to be migrated.
Caller ID Forwarding
How the caller’s phone number is forwarded depends on the type of transfer:| Transfer Type | Forwards Caller ID |
|---|---|
| Cold transfer | Yes |
| Cold transfer with extension | No |
| Warm transfer | No |
Managing Transfers
Once created, your transfers will appear in the table. You can view:- Name
- Trigger Phrase
- Transfer Pattern
- Phone Number
- Reusability
- Staff Briefing (active vs inactive)
- Post-Connection (active vs inactive)
- Active Agents
- Actions (edit or delete)