> ## Documentation Index
> Fetch the complete documentation index at: https://docs.replify.ai/llms.txt
> Use this file to discover all available pages before exploring further.
# Managing Your Campaign
> Monitor campaign statuses, manage contacts, review outreach, and track performance
export const BaseUrl = ({path = '', children}) => {
const baseUrl = 'https://app.replify.ai';
const fullUrl = path ? `${baseUrl}${path.startsWith('/') ? path : `/${path}`}` : baseUrl;
if (children) {
return {children};
}
return fullUrl;
};
## Campaign Dashboard
After creating a campaign, you'll land on the campaign management view. From here you can manage contacts, review performance, and adjust configuration.
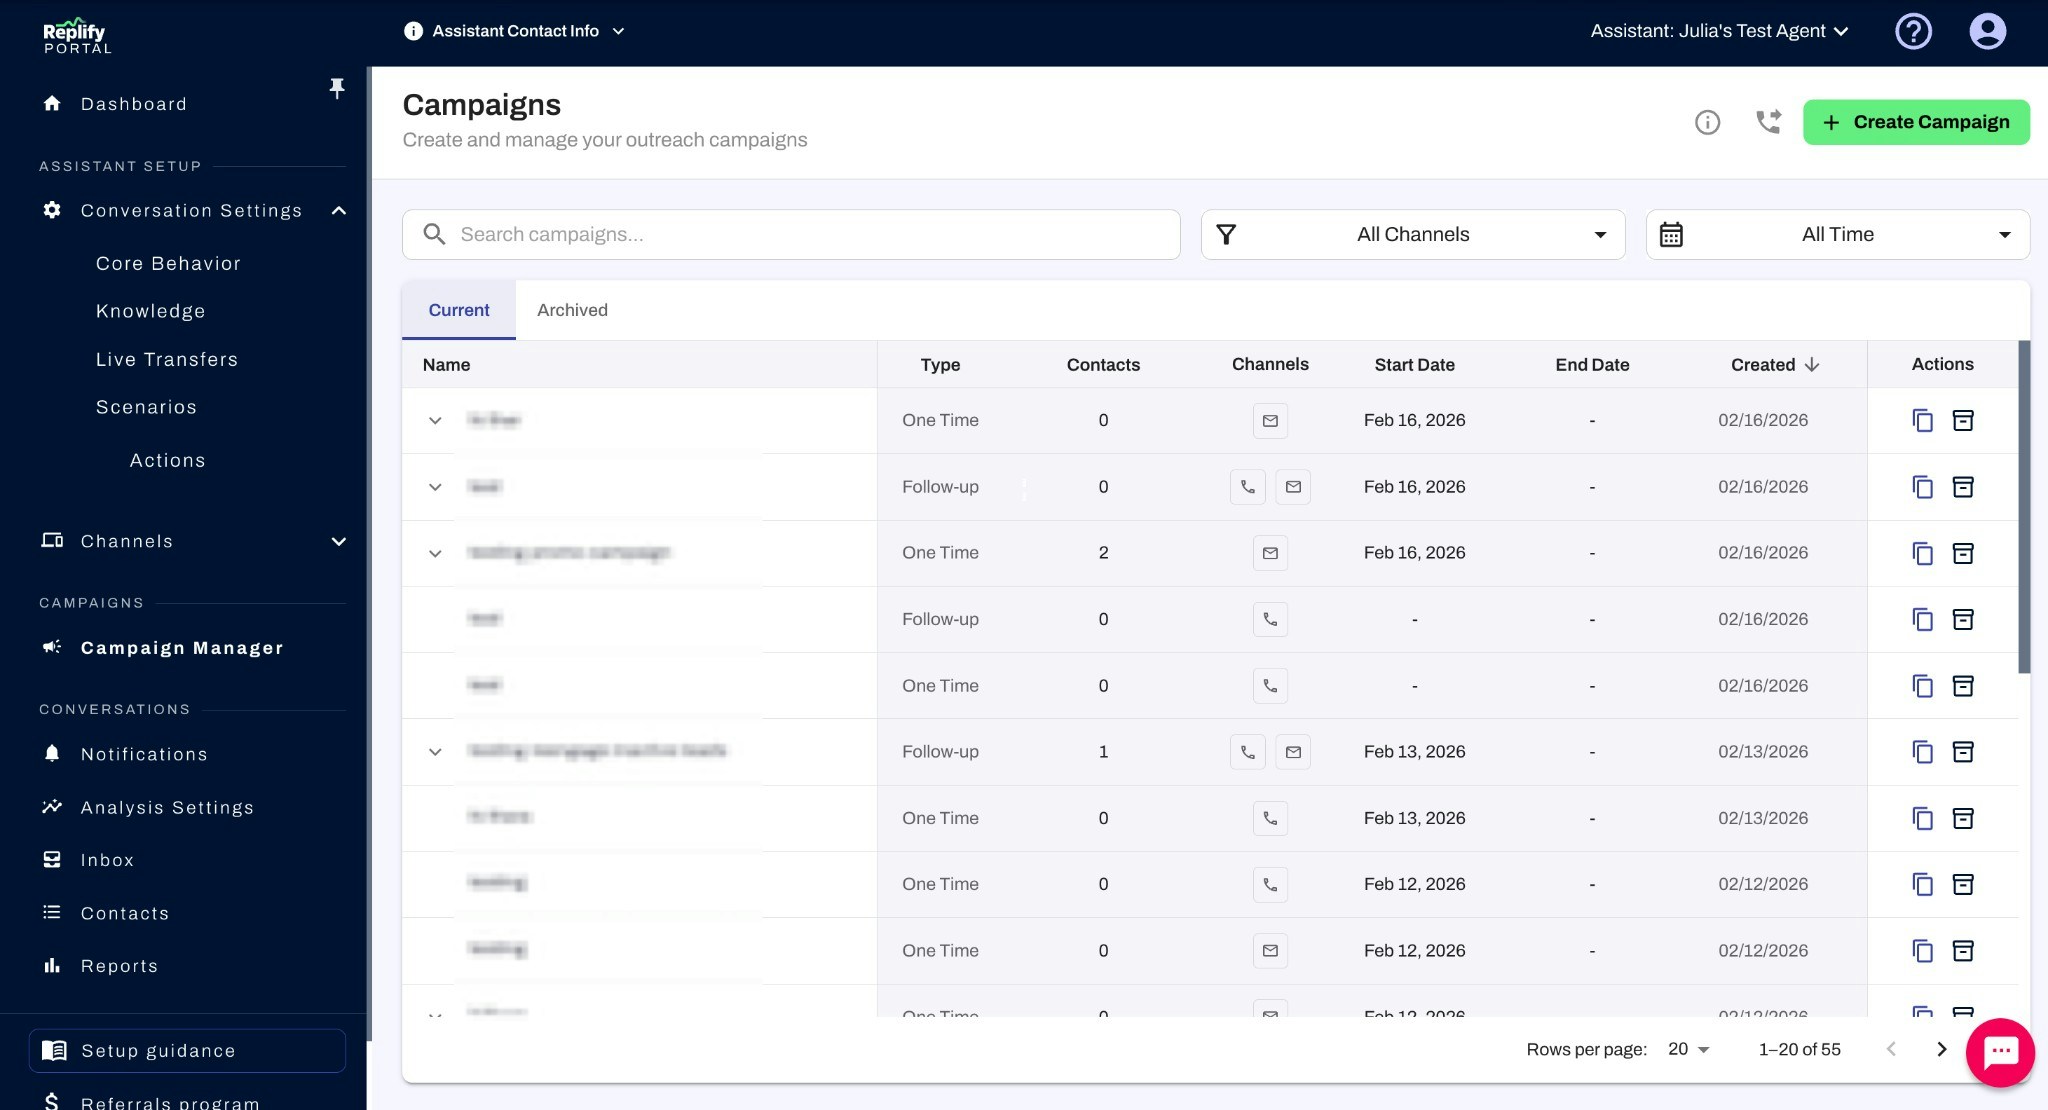 The Campaign Manager shows all your campaigns with key information:
* **Name** — Campaign title
* **Type** — One Time (simple) or Follow-up (ongoing)
* **Contacts** — Number of contacts in the campaign
* **Channels** — Which communication channels are enabled (phone, email, text)
* **Start Date** and **End Date** — Campaign schedule
* **Created** — When the campaign was created
Use the **search bar**, **channel filter**, and **date filter** to find specific campaigns. Switch between the **Current** and **Archived** tabs to view active or archived campaigns.
## Campaign Statuses
Every campaign has a status that indicates where it is in its lifecycle:
| Status | Description |
| ------------ | ----------------------------------------------------------------------------------------------------------------------------- |
| **Draft** | Campaign has been created but has not been started yet. You can still edit all settings and configuration. |
| **Active** | Campaign is live and ready for outreach. Depending on the execution mode, outreach may require additional action (see below). |
| **Paused** | Campaign has been temporarily stopped. No outreach will be sent until it is resumed. |
| **Archived** | Campaign has been archived and is no longer active. Visible in the Archived tab. |
### Campaign Lifecycle
Once you activate a campaign by pressing **Go Live**, you cannot return it to Draft status. Make sure all your configuration settings are finalized before going live.
* **Go Live**: From Draft, press **Go Live** to activate your campaign. This is a one-way action — you cannot return to Draft after going live.
* **Pause**: Click the **Pause** button to temporarily stop all outreach. You can resume at any time.
* **Resume**: Unpause a paused campaign to continue sending outreach where it left off.
* **Archive**: Move a completed or no-longer-needed campaign to the Archived tab.
An **Active** campaign does not necessarily mean outreach is happening right now. What happens next depends on the execution mode:
* **Scheduled**: Outreach is sent automatically at the scheduled date and time.
* **Run manually**: You need to click **Start all outreaches** to trigger outreach. The campaign stays active between runs.
* **Run automatically when contacts are added**: Outreach is sent as contacts are added. If there are no contacts in the queue, the campaign is active but idle.
* **Manual Review enabled**: Outreach is planned by the AI but won't be sent until you approve each individual outreach.
## Managing Contacts
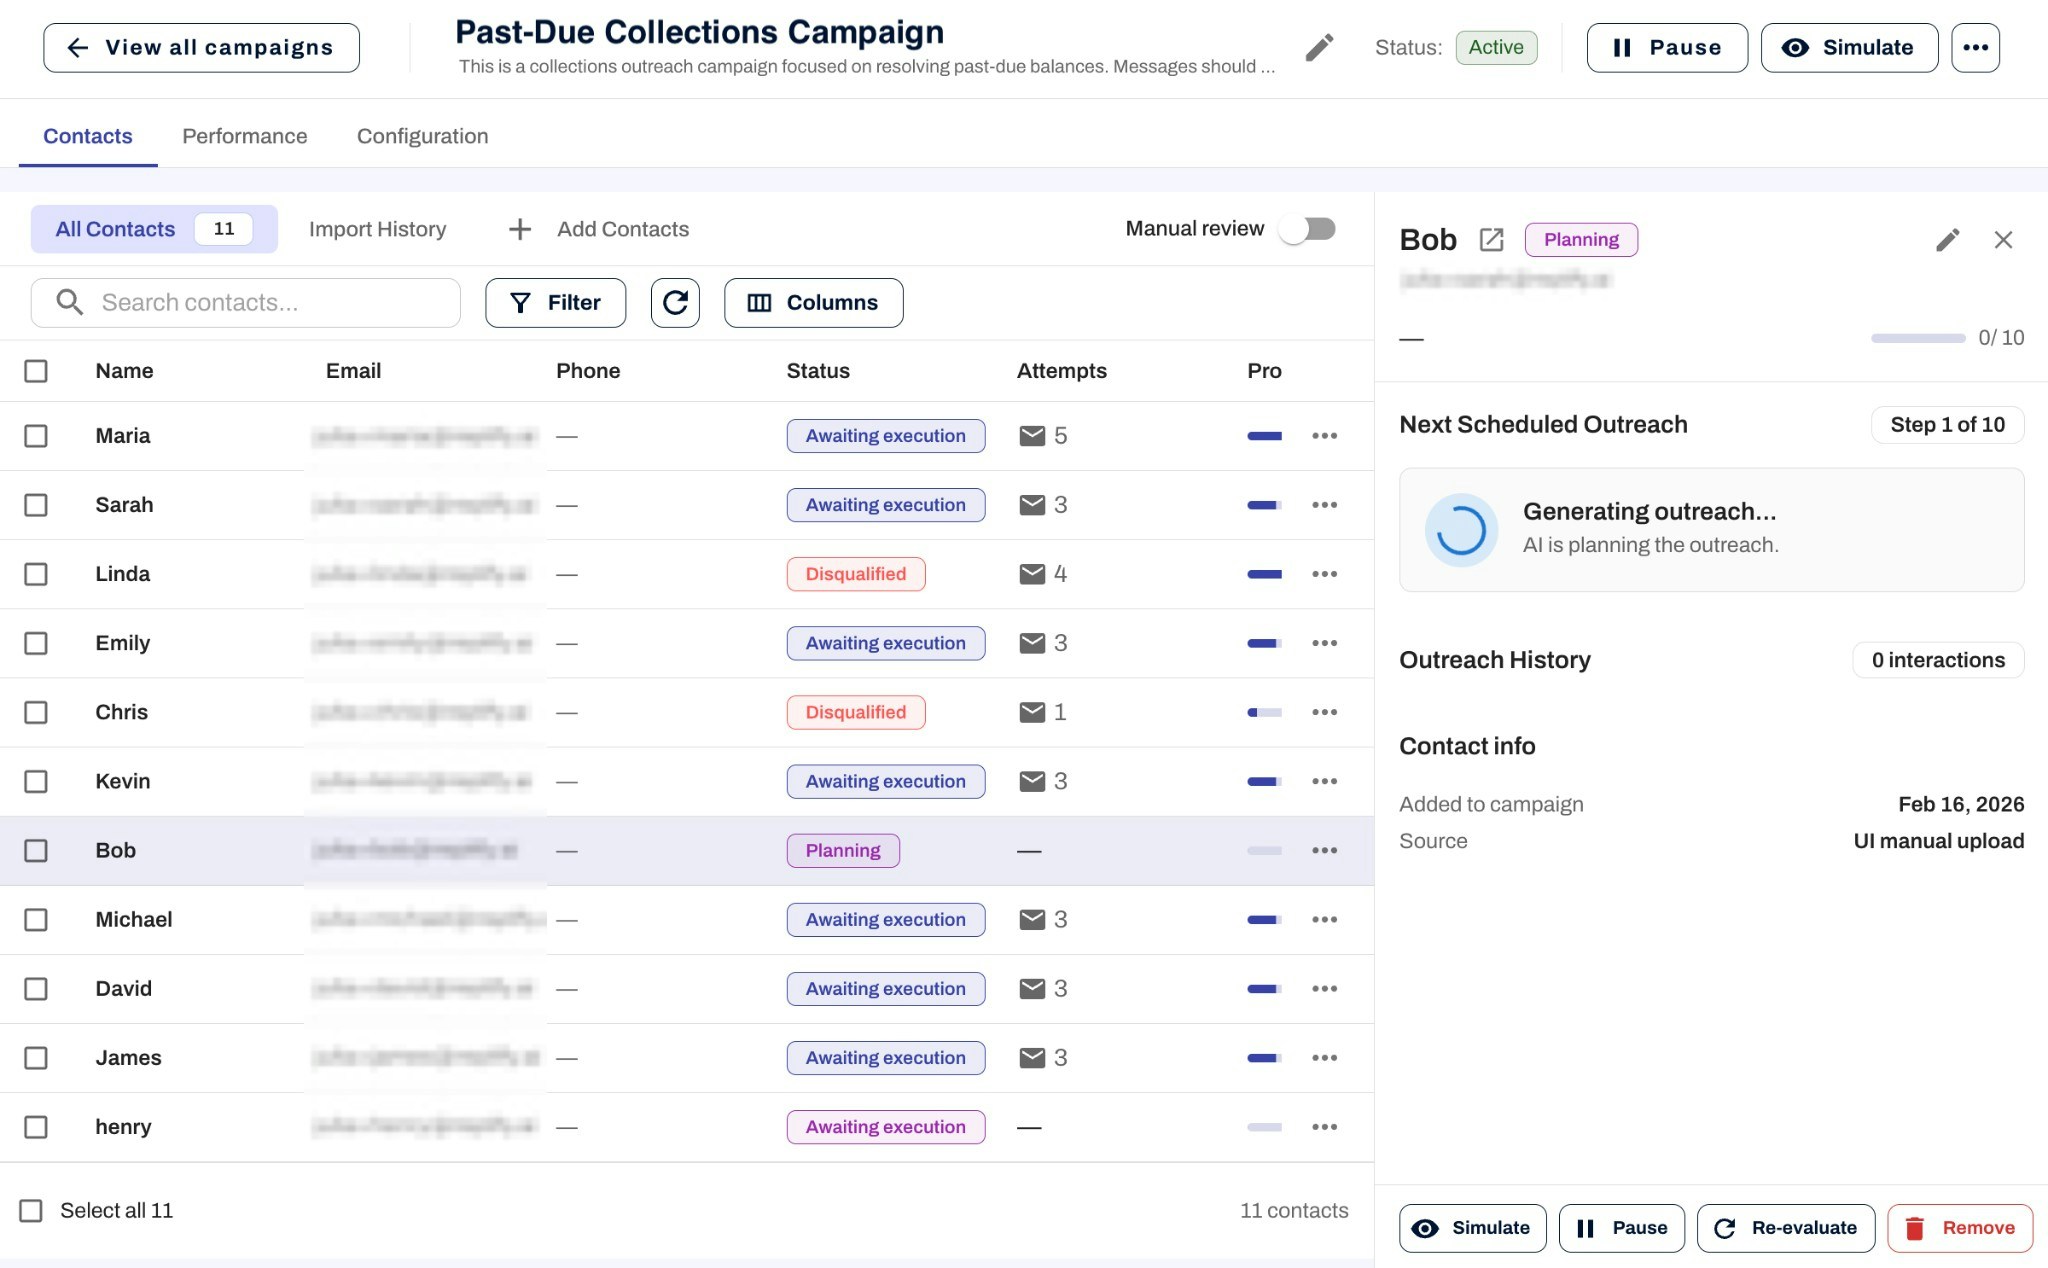
The **Contacts** tab lets you add and manage contacts in your campaign.
The Campaign Manager shows all your campaigns with key information:
* **Name** — Campaign title
* **Type** — One Time (simple) or Follow-up (ongoing)
* **Contacts** — Number of contacts in the campaign
* **Channels** — Which communication channels are enabled (phone, email, text)
* **Start Date** and **End Date** — Campaign schedule
* **Created** — When the campaign was created
Use the **search bar**, **channel filter**, and **date filter** to find specific campaigns. Switch between the **Current** and **Archived** tabs to view active or archived campaigns.
## Campaign Statuses
Every campaign has a status that indicates where it is in its lifecycle:
| Status | Description |
| ------------ | ----------------------------------------------------------------------------------------------------------------------------- |
| **Draft** | Campaign has been created but has not been started yet. You can still edit all settings and configuration. |
| **Active** | Campaign is live and ready for outreach. Depending on the execution mode, outreach may require additional action (see below). |
| **Paused** | Campaign has been temporarily stopped. No outreach will be sent until it is resumed. |
| **Archived** | Campaign has been archived and is no longer active. Visible in the Archived tab. |
### Campaign Lifecycle
Once you activate a campaign by pressing **Go Live**, you cannot return it to Draft status. Make sure all your configuration settings are finalized before going live.
* **Go Live**: From Draft, press **Go Live** to activate your campaign. This is a one-way action — you cannot return to Draft after going live.
* **Pause**: Click the **Pause** button to temporarily stop all outreach. You can resume at any time.
* **Resume**: Unpause a paused campaign to continue sending outreach where it left off.
* **Archive**: Move a completed or no-longer-needed campaign to the Archived tab.
An **Active** campaign does not necessarily mean outreach is happening right now. What happens next depends on the execution mode:
* **Scheduled**: Outreach is sent automatically at the scheduled date and time.
* **Run manually**: You need to click **Start all outreaches** to trigger outreach. The campaign stays active between runs.
* **Run automatically when contacts are added**: Outreach is sent as contacts are added. If there are no contacts in the queue, the campaign is active but idle.
* **Manual Review enabled**: Outreach is planned by the AI but won't be sent until you approve each individual outreach.
## Managing Contacts
The **Contacts** tab lets you add and manage contacts in your campaign.
 ### Adding Contacts
Click **+ Add Contacts** to choose how to add contacts to your campaign. Contacts are deduplicated based on phone first and email secondarily.
### Adding Contacts
Click **+ Add Contacts** to choose how to add contacts to your campaign. Contacts are deduplicated based on phone first and email secondarily.
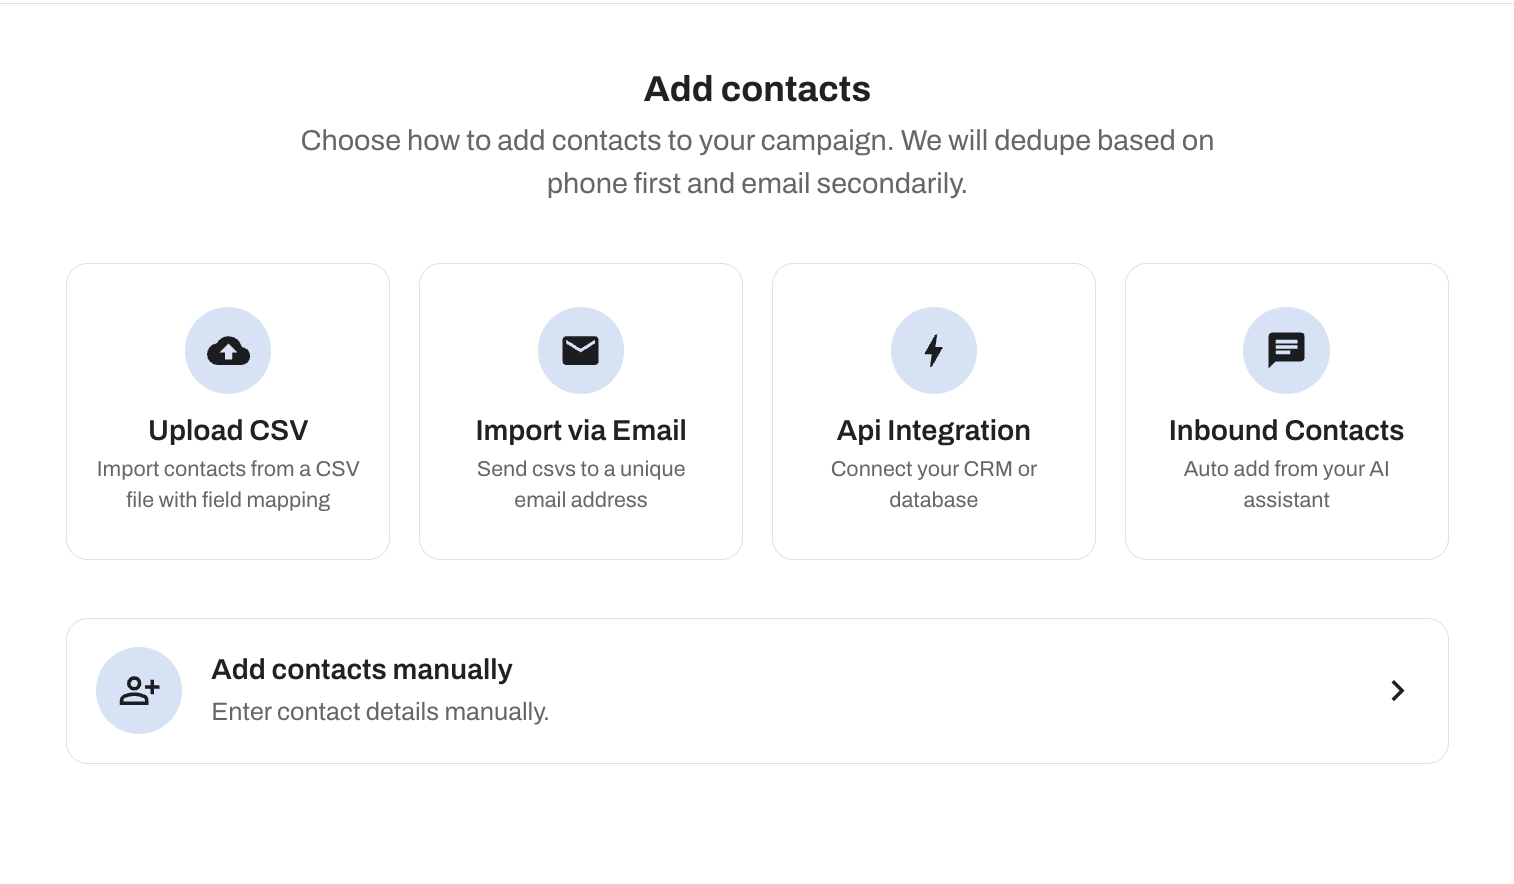 #### Upload CSV
Import contacts from a CSV file with custom field mapping.
**CSV Requirements:**
* First row should contain column headers
* Required fields: Name, Phone or Email
* Maximum 10,000 contacts per upload
Drag and drop your CSV file or click **browse** to upload from your computer.
For **organization-wide** campaigns, the uploader includes **Assistant Routing** (labeled **ORG-WIDE** in the product). The same routing options apply when you set up **Import via Email** using a sample CSV—see [Assistant routing (organization-wide)](#assistant-routing-organization-wide).
#### Import via Email
Send CSV files to a unique campaign email address for automatic import. This is useful for recurring imports or when you want to send contacts from another system.
**How to use:**
1. Upload a sample CSV file to configure column mapping
2. Map your CSV columns to system fields (name, email, phone, and custom properties)
3. For **organization-wide** campaigns, configure **Assistant Routing** for that sample file the same way as a direct CSV upload ([Assistant routing](#assistant-routing-organization-wide))
4. Set the authorized sender email address — only emails from this address will be processed
5. Send future CSVs with the same format to the provided campaign email address
6. Track the import status in the import history
#### Assistant routing (organization-wide)
When a campaign spans multiple assistants (**ORG-WIDE**), **Add contacts** shows **Assistant Routing**: *Choose how contacts in this CSV should be assigned to assistants.* You’ll see this when uploading a CSV directly **and** when you load a sample CSV for **Import via Email**. [**External IDs**](/account-management/multiple-assistants#external-ids-crm-syncing) must already be configured in **Manage Assistants** so routing has keys and values to match.
Pick one of three modes:
| Mode | What you configure |
| ---------------------- | -------------------------------------------------------------------------------------------------------------------------------------------------------------------------------------------------------------------------------------------------------------------------------------------------------------------------------------------------- |
| **Single assistant** | One assistant for **every row** — all contacts attach to your selection (“Every contact in this CSV will be added to the selected assistant”). |
| **Route by ID column** | **Assistant column** — which CSV column holds the CRM values to match.
#### Upload CSV
Import contacts from a CSV file with custom field mapping.
**CSV Requirements:**
* First row should contain column headers
* Required fields: Name, Phone or Email
* Maximum 10,000 contacts per upload
Drag and drop your CSV file or click **browse** to upload from your computer.
For **organization-wide** campaigns, the uploader includes **Assistant Routing** (labeled **ORG-WIDE** in the product). The same routing options apply when you set up **Import via Email** using a sample CSV—see [Assistant routing (organization-wide)](#assistant-routing-organization-wide).
#### Import via Email
Send CSV files to a unique campaign email address for automatic import. This is useful for recurring imports or when you want to send contacts from another system.
**How to use:**
1. Upload a sample CSV file to configure column mapping
2. Map your CSV columns to system fields (name, email, phone, and custom properties)
3. For **organization-wide** campaigns, configure **Assistant Routing** for that sample file the same way as a direct CSV upload ([Assistant routing](#assistant-routing-organization-wide))
4. Set the authorized sender email address — only emails from this address will be processed
5. Send future CSVs with the same format to the provided campaign email address
6. Track the import status in the import history
#### Assistant routing (organization-wide)
When a campaign spans multiple assistants (**ORG-WIDE**), **Add contacts** shows **Assistant Routing**: *Choose how contacts in this CSV should be assigned to assistants.* You’ll see this when uploading a CSV directly **and** when you load a sample CSV for **Import via Email**. [**External IDs**](/account-management/multiple-assistants#external-ids-crm-syncing) must already be configured in **Manage Assistants** so routing has keys and values to match.
Pick one of three modes:
| Mode | What you configure |
| ---------------------- | -------------------------------------------------------------------------------------------------------------------------------------------------------------------------------------------------------------------------------------------------------------------------------------------------------------------------------------------------- |
| **Single assistant** | One assistant for **every row** — all contacts attach to your selection (“Every contact in this CSV will be added to the selected assistant”). |
| **Route by ID column** | **Assistant column** — which CSV column holds the CRM values to match.
**Match against** — which configured **assistant external ID key** those values correspond to (for example picking `hubspotId` from your Manage Assistants definitions). Summary in product: select the CSV column and the external ID **key** to match against. |
| **Route by columns** | **Assistant external id key column** — CSV column with the external ID **name** per row.
**Assistant external id value column** — CSV column with the external ID **value** per row (each row pairs its own key and value against Manage Assistants). |
Programmatic uploads use the same pairing idea as **`externalIdKey`** / **`externalIdValue`** in the [Campaign Service API](/api-reference/campaigns/manage-campaign-contacts).
#### API Integration
The campaign shows an API URL in the portal for programmatic contact sync from your CRM or database.
**Read the [Campaign Service API](/api-reference/campaigns/manage-campaign-contacts)** for authentication, request body, optional **`externalIdKey`** / **`externalIdValue`**, examples, and errors.
On **Multi-Assistant** campaigns, define **external IDs** per assistant in [**Manage Assistants**](/account-management/multiple-assistants#external-ids-crm-syncing) before wiring up imports.
#### Inbound Contacts
Automatically add new contacts that call or message your AI assistant if they match your contact eligibility criteria. Toggle **Add new inbound contacts** to enable.
#### Add Contacts Manually
Enter contact details by hand. Fill in the first name, last name, email, and phone number. You can also add custom properties using **+ Add Custom Property**.
### Contact Statuses
Each contact in a campaign has a status that indicates their current state:
| Status | Description |
| ---------------------- | ------------------------------------------------------------------------------------------------ |
| **Planning** | The AI is currently planning the next outreach for this contact. |
| **Awaiting execution** | Outreach has been planned and the contact is queued, waiting for outreach to be sent. |
| **Executing** | Outreach is actively being sent to this contact. |
| **Completed** | All outreach for this contact has been completed. This contact will not be reached out to again. |
| **Disqualified** | Contact has been disqualified from the campaign based on eligibility criteria or other factors. |
| **Disabled** | Contact has been individually paused within the campaign. |
| **Campaign paused** | The campaign itself is paused, so no outreach is being sent. |
When Manual Review is enabled, contacts will show **Awaiting approval** instead of **Awaiting execution**. This means the outreach has been planned and is waiting for your approval before being sent.
### Contact Details
Click on any contact to open the detail panel, which shows:
* Contact information (name, email, phone)
* Current status and number of attempts
* Progress through the campaign (e.g., 4/10 attempts)
* Response history
* **Next Scheduled Outreach** — Preview of the next message, including channel, date/time, subject, and body
* **Outreach History** — A log of all past outreach attempts and their outcomes
From the contact detail panel, you can also **Edit** upcoming outreach, **Simulate** the next interaction, **Pause** the contact, **Re-evaluate** their eligibility, or **Remove** them from the campaign.
## Manual Review
If you want to approve each outreach before it's sent, toggle **Manual Review** on in the campaign view.
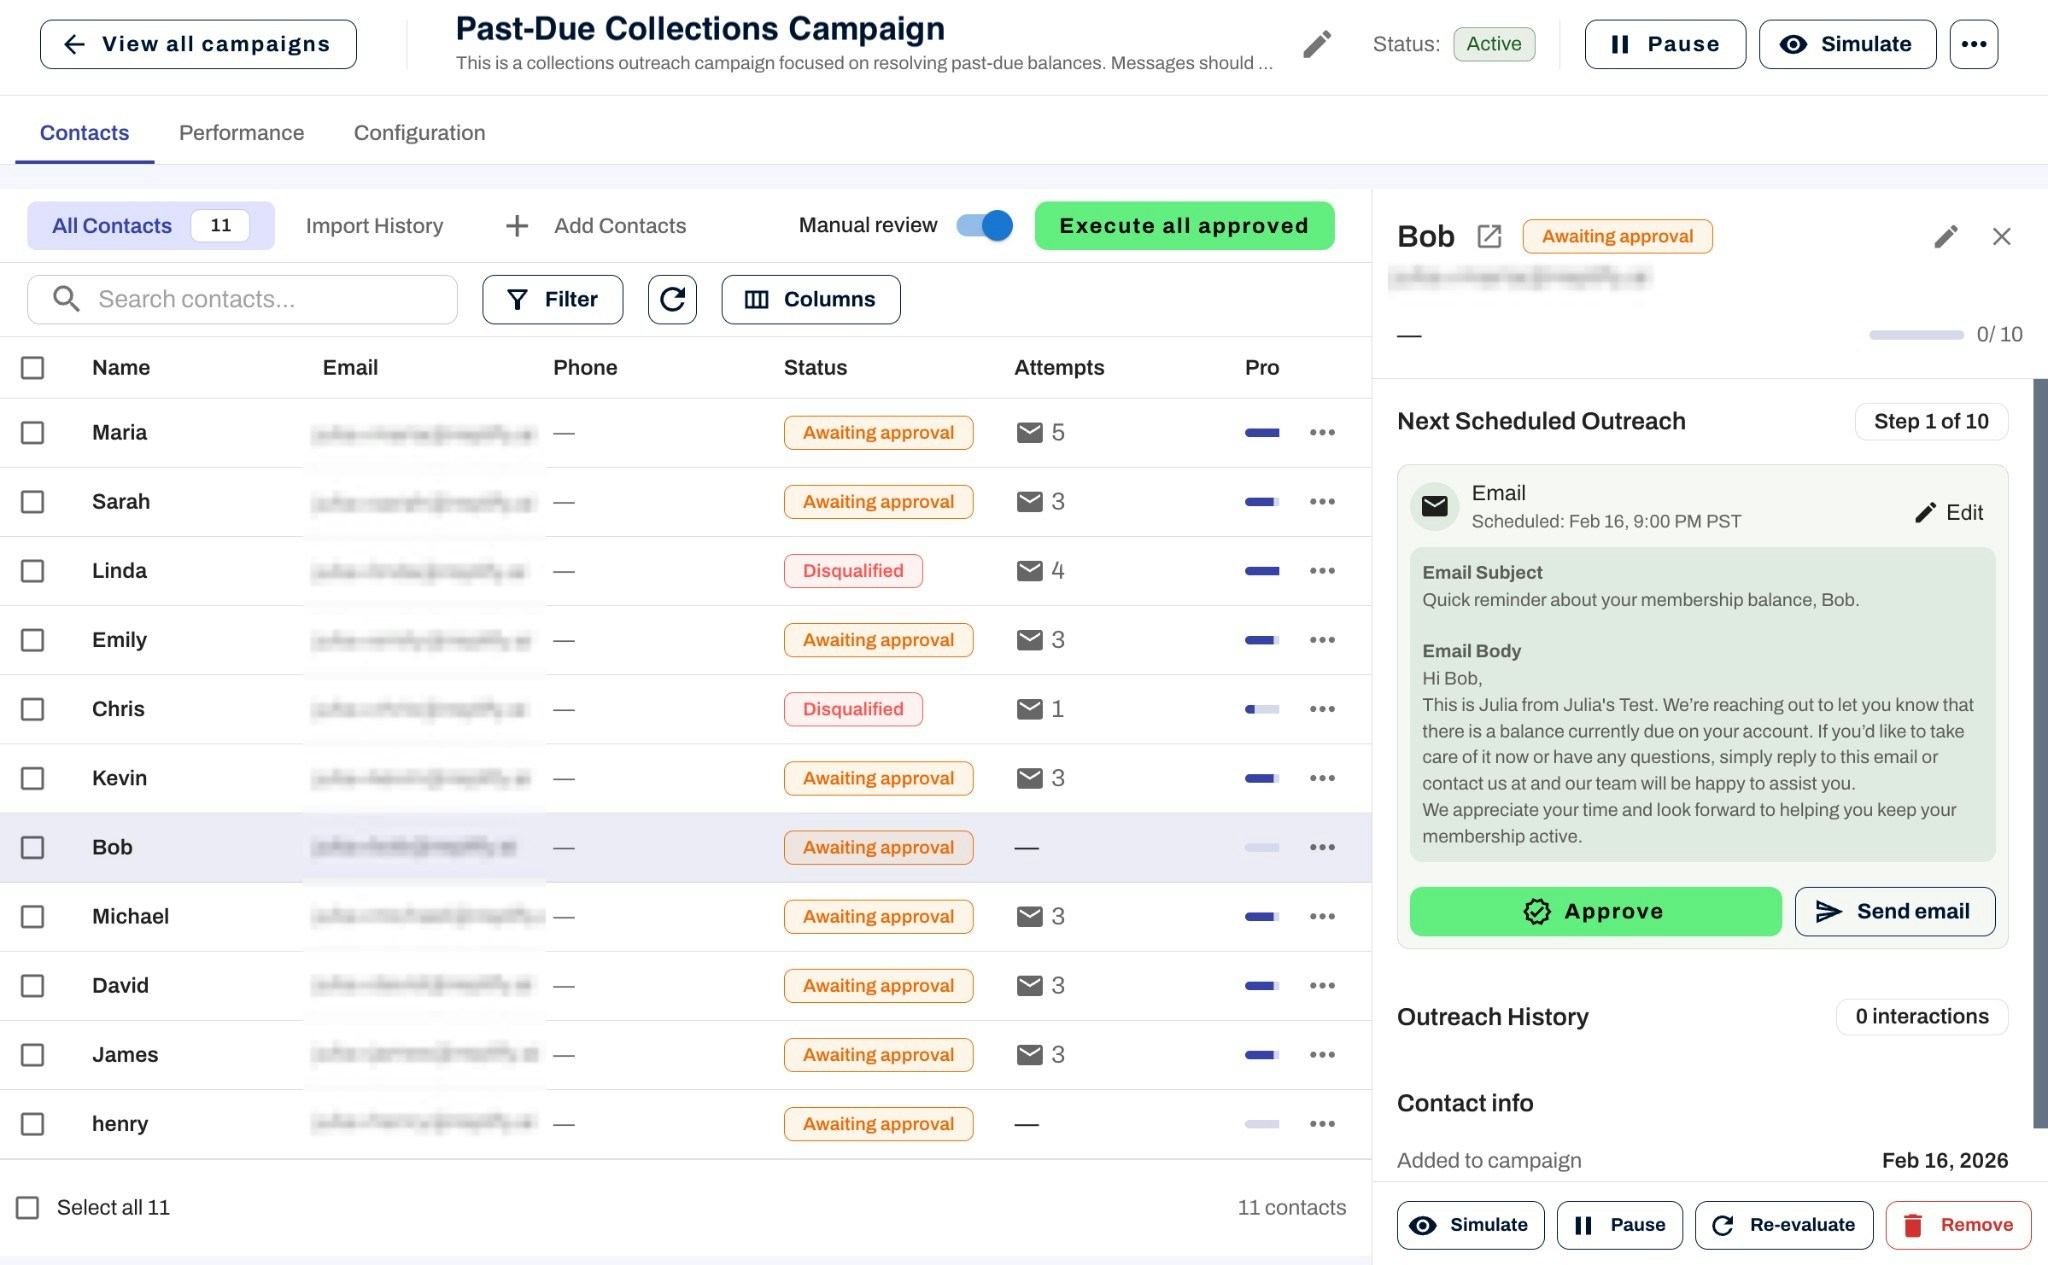 When Manual Review is enabled:
* Contact statuses will show **Awaiting approval** instead of **Awaiting execution**
* Click on a contact to preview the outreach the AI has generated
* Choose **Approve** to confirm the outreach, or **Edit** to make changes before sending
* Use **Execute all approved** to send all approved outreaches at once
Manual Review is useful when you want to verify the AI's messaging before it reaches your contacts, especially during the early stages of a campaign.
## Performance & Reports
The **Performance** tab provides analytics and insights about your campaign, including:
* Outreach statistics
* Contact engagement metrics
* Response rates by channel
## Campaign Configuration
The **Configuration** tab shows a read-only summary of your campaign settings so you can quickly review your setup without navigating back to the edit screen. This is especially useful once a campaign is active, since configuration cannot be edited after going live.
## Simulating Your Campaign
You can use the **Simulate** button at any time to test how your campaign would interact with a contact. This runs a simulation without actually sending any outreach, so you can safely verify your messaging and configuration.
During a simulation, you can also send in example responses to see how the AI will reply to follow-up messages from the customer. This is useful for testing how the AI handles questions, objections, or other responses beyond the initial outreach.
When Manual Review is enabled:
* Contact statuses will show **Awaiting approval** instead of **Awaiting execution**
* Click on a contact to preview the outreach the AI has generated
* Choose **Approve** to confirm the outreach, or **Edit** to make changes before sending
* Use **Execute all approved** to send all approved outreaches at once
Manual Review is useful when you want to verify the AI's messaging before it reaches your contacts, especially during the early stages of a campaign.
## Performance & Reports
The **Performance** tab provides analytics and insights about your campaign, including:
* Outreach statistics
* Contact engagement metrics
* Response rates by channel
## Campaign Configuration
The **Configuration** tab shows a read-only summary of your campaign settings so you can quickly review your setup without navigating back to the edit screen. This is especially useful once a campaign is active, since configuration cannot be edited after going live.
## Simulating Your Campaign
You can use the **Simulate** button at any time to test how your campaign would interact with a contact. This runs a simulation without actually sending any outreach, so you can safely verify your messaging and configuration.
During a simulation, you can also send in example responses to see how the AI will reply to follow-up messages from the customer. This is useful for testing how the AI handles questions, objections, or other responses beyond the initial outreach.