> ## Documentation Index
> Fetch the complete documentation index at: https://docs.replify.ai/llms.txt
> Use this file to discover all available pages before exploring further.
# Creating a Campaign
> Step-by-step guide to setting up simple outreach and ongoing sequence campaigns
export const SupportEmail = () => {
return help@replify.ai;
};
export const BaseUrl = ({path = '', children}) => {
const baseUrl = 'https://app.replify.ai';
const fullUrl = path ? `${baseUrl}${path.startsWith('/') ? path : `/${path}`}` : baseUrl;
if (children) {
return {children};
}
return fullUrl;
};
## Getting Started
1. Log in to your AI Assistant portal
2. Navigate to **Campaign Manager** in the left navigation bar
3. Click **+ Create Campaign**
4. Choose a template or select **Create from Scratch** (see [Campaign Templates](/campaigns/campaign-templates) for details on available templates)
5. Enter a **Campaign Name** in the popup that appears, then confirm to create the campaign
You can edit the campaign name later in the campaign configuration.
The campaign wizard walks through these panels in order:
1. **Campaign Basics** — Campaign details and schedule (toggle **Multi-Assistant Campaign** here when needed).
2. **Delivery & Timing** — Channels, messaging, and execution settings.
3. **Behavior & Rules** — Knowledge, instructions, and eligibility criteria.
Multi-Assistant adds a fourth panel (**Multi-Assistant Setup**) after **Behavior & Rules** so you can attach other assistants and their customizations. Read [Multi-Assistant Campaigns](/campaigns/multi-assistant-campaigns) for setup.
Save after the final wizard panel—for example via **Save and Manage Campaign**—then use **Simulate campaign** from the campaign **edit or management view** whenever you want to rehearse outreach before contacts are reached.
Make sure all your configuration settings are finalized before going live. Once a campaign is active, you cannot return it to Draft status.
***
## Creating a Simple Campaign
Simple campaigns are designed for one-time outreach where each contact is reached once through a single channel.
### Step 1: Campaign Basics
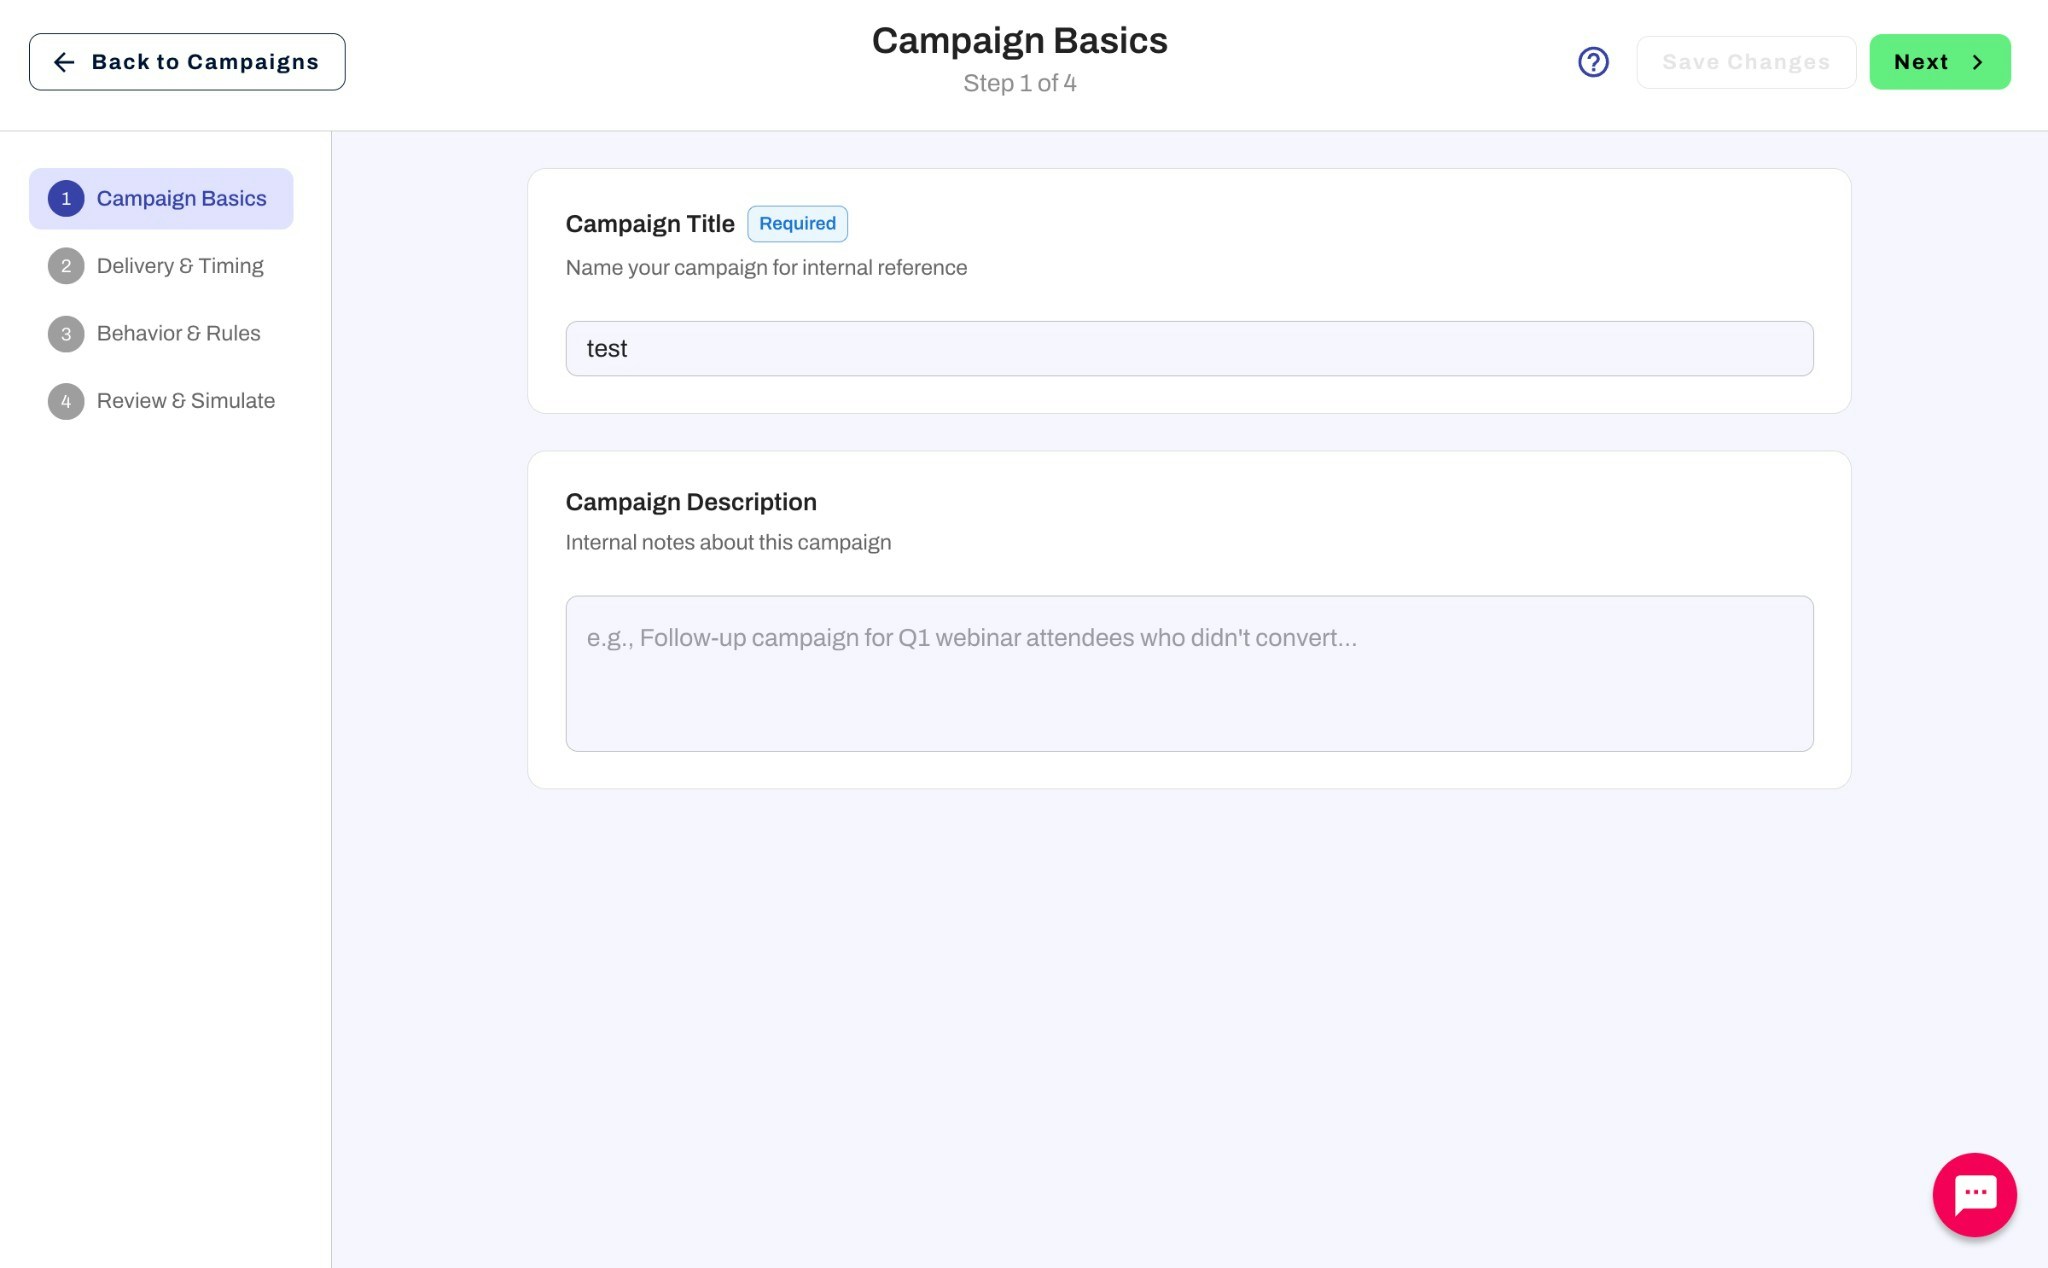 **Campaign Title** *(required)*: Your campaign name (set during creation, editable here).
**Campaign Description**: Optional internal notes about this campaign.
### Step 2: Delivery & Timing
**Campaign Title** *(required)*: Your campaign name (set during creation, editable here).
**Campaign Description**: Optional internal notes about this campaign.
### Step 2: Delivery & Timing
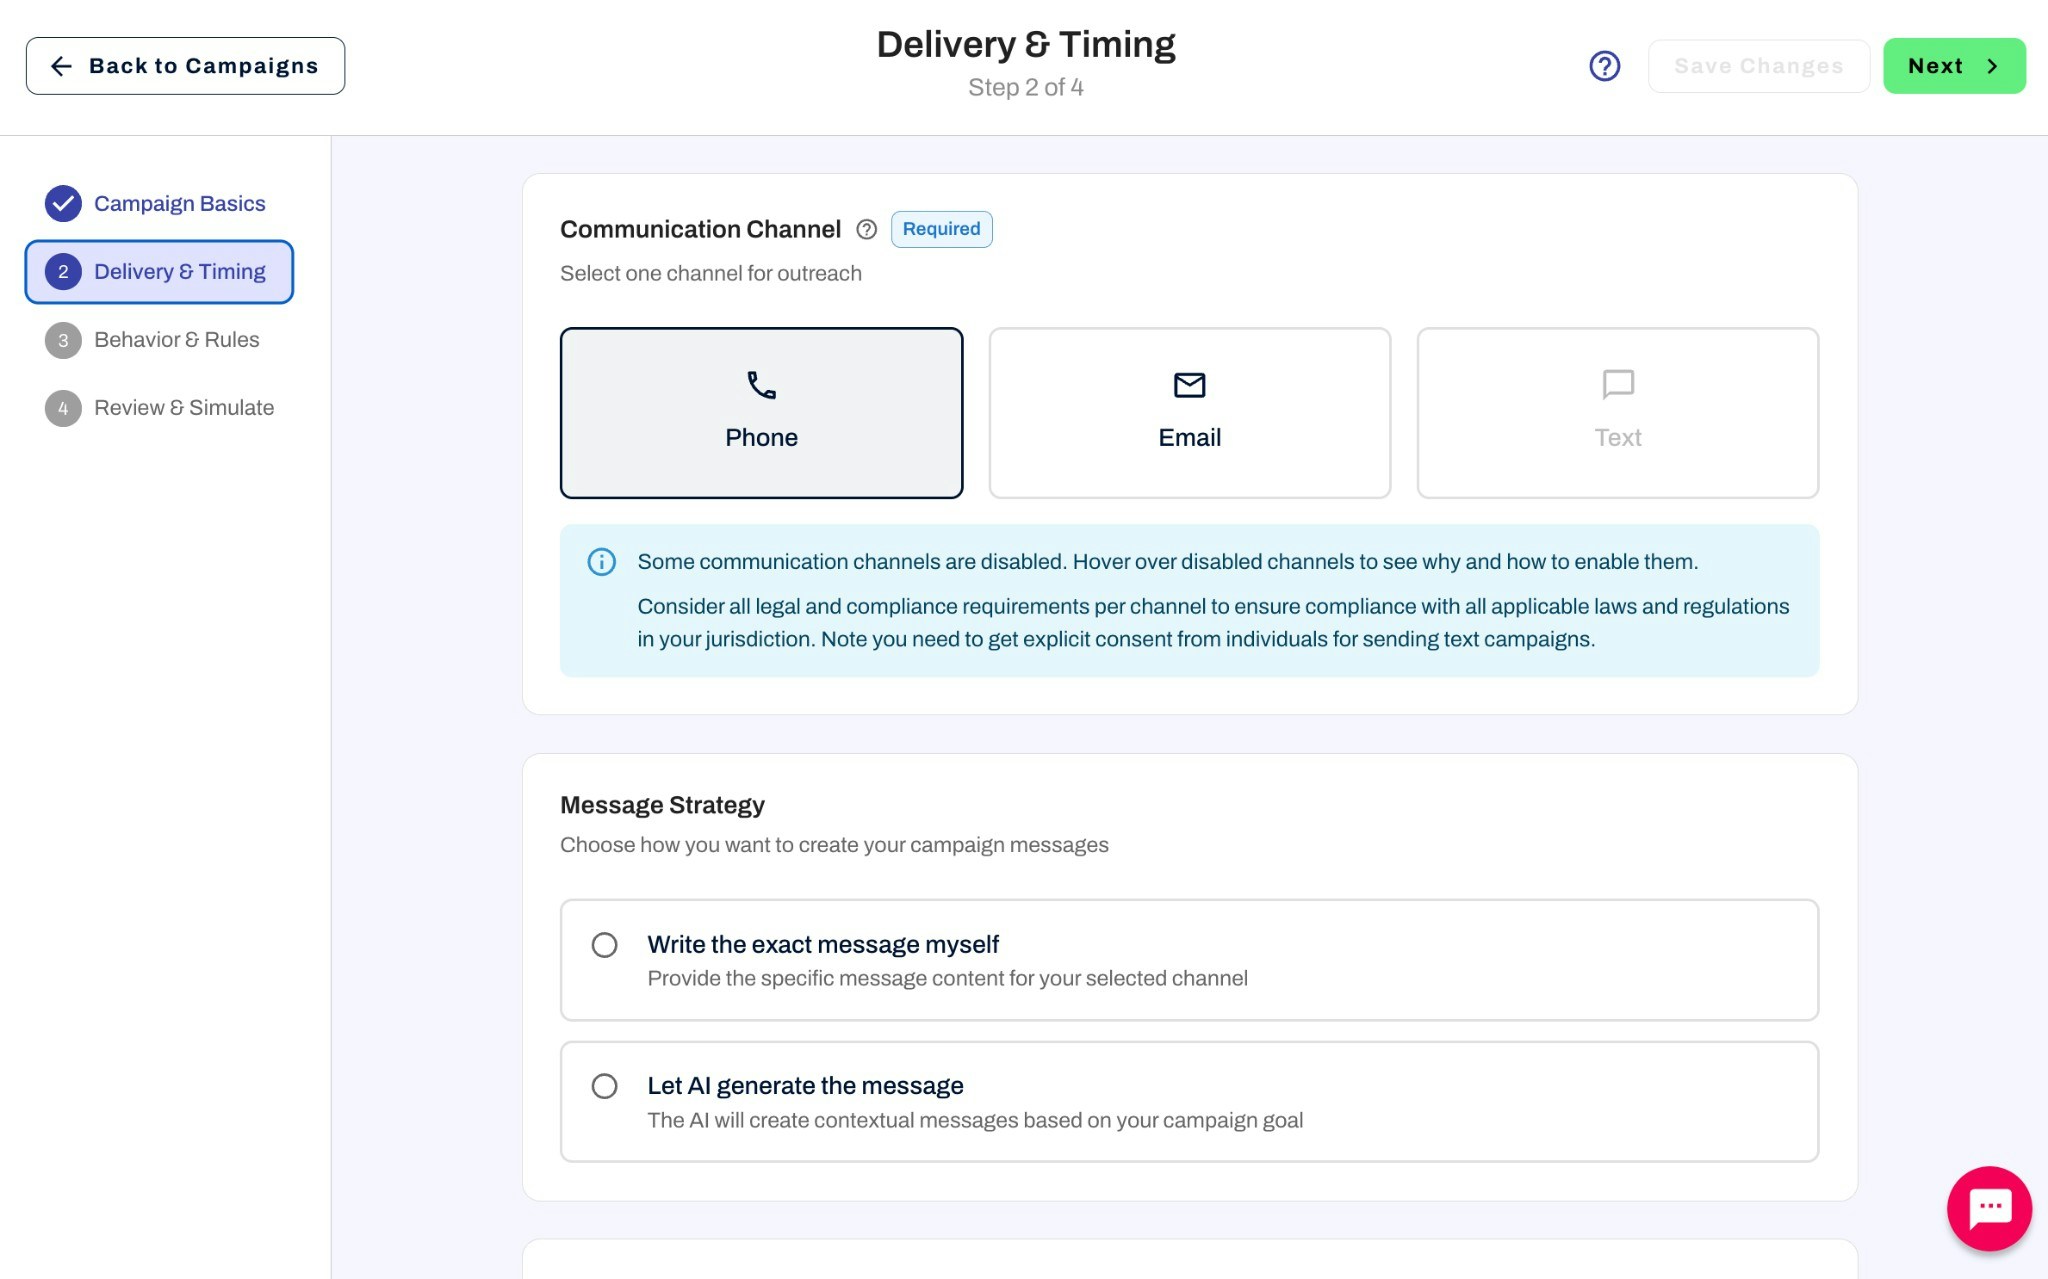 #### Communication Channel *(required)*
Select **one** channel for outreach: Phone, Email, or Text.
Some communication channels may be disabled. Hover over disabled channels to see why and how to enable them. Consider all legal and compliance requirements per channel to ensure compliance with all applicable laws and regulations in your jurisdiction. You need to get explicit consent from individuals for sending text campaigns.
#### Message Strategy
Choose how you want to create your campaign messages:
* **Write the exact message myself** — Provide the specific message content for your selected channel
* **Let AI generate the message** — The AI will create contextual messages based on your campaign goal
#### Campaign Execution
Choose when you want this campaign to run:
**Run at a specific date & time** — Schedule your campaign to start at a precise date and time. All contacts in the list will be contacted at the scheduled time.
* **Scheduled Date** *(required)*: When the first outreach will be sent (MM/DD/YYYY)
* **Scheduled Time**: Select a specific time or choose "As soon as possible." Time is based on the timezone set in Core Behavior.
After the scheduled date passes, the campaign switches to an "as soon as contacts are added" mode — any new contacts added to the campaign will be reached out to immediately. There is currently no option to re-schedule for a future date.
**Run manually** — You control when outreach is sent. Here's how it works:
1. Complete your campaign configuration and add your contacts
2. Press **Go Live** to mark the campaign as active
3. Click **Start all outreaches** to begin contacting all contacts in the list
4. Once the campaign finishes, you can add new contacts and click **Start all outreaches** again to reach the new contacts
When you re-run a manual campaign, it will also retry contacts that failed during the previous run. If you don't want failed contacts to be retried, remove them from the contact list before starting again. Contacts with a **Completed** status will not be reached out to again.
**Run automatically when contacts are added** — The campaign will automatically reach out to contacts as they are added to the campaign. Outreach is only sent during business hours based on the timezone set in Core Behavior. If a contact is added outside of business hours, the outreach will be sent once business hours resume.
### Step 3: Behavior & Rules
#### Communication Channel *(required)*
Select **one** channel for outreach: Phone, Email, or Text.
Some communication channels may be disabled. Hover over disabled channels to see why and how to enable them. Consider all legal and compliance requirements per channel to ensure compliance with all applicable laws and regulations in your jurisdiction. You need to get explicit consent from individuals for sending text campaigns.
#### Message Strategy
Choose how you want to create your campaign messages:
* **Write the exact message myself** — Provide the specific message content for your selected channel
* **Let AI generate the message** — The AI will create contextual messages based on your campaign goal
#### Campaign Execution
Choose when you want this campaign to run:
**Run at a specific date & time** — Schedule your campaign to start at a precise date and time. All contacts in the list will be contacted at the scheduled time.
* **Scheduled Date** *(required)*: When the first outreach will be sent (MM/DD/YYYY)
* **Scheduled Time**: Select a specific time or choose "As soon as possible." Time is based on the timezone set in Core Behavior.
After the scheduled date passes, the campaign switches to an "as soon as contacts are added" mode — any new contacts added to the campaign will be reached out to immediately. There is currently no option to re-schedule for a future date.
**Run manually** — You control when outreach is sent. Here's how it works:
1. Complete your campaign configuration and add your contacts
2. Press **Go Live** to mark the campaign as active
3. Click **Start all outreaches** to begin contacting all contacts in the list
4. Once the campaign finishes, you can add new contacts and click **Start all outreaches** again to reach the new contacts
When you re-run a manual campaign, it will also retry contacts that failed during the previous run. If you don't want failed contacts to be retried, remove them from the contact list before starting again. Contacts with a **Completed** status will not be reached out to again.
**Run automatically when contacts are added** — The campaign will automatically reach out to contacts as they are added to the campaign. Outreach is only sent during business hours based on the timezone set in Core Behavior. If a contact is added outside of business hours, the outreach will be sent once business hours resume.
### Step 3: Behavior & Rules
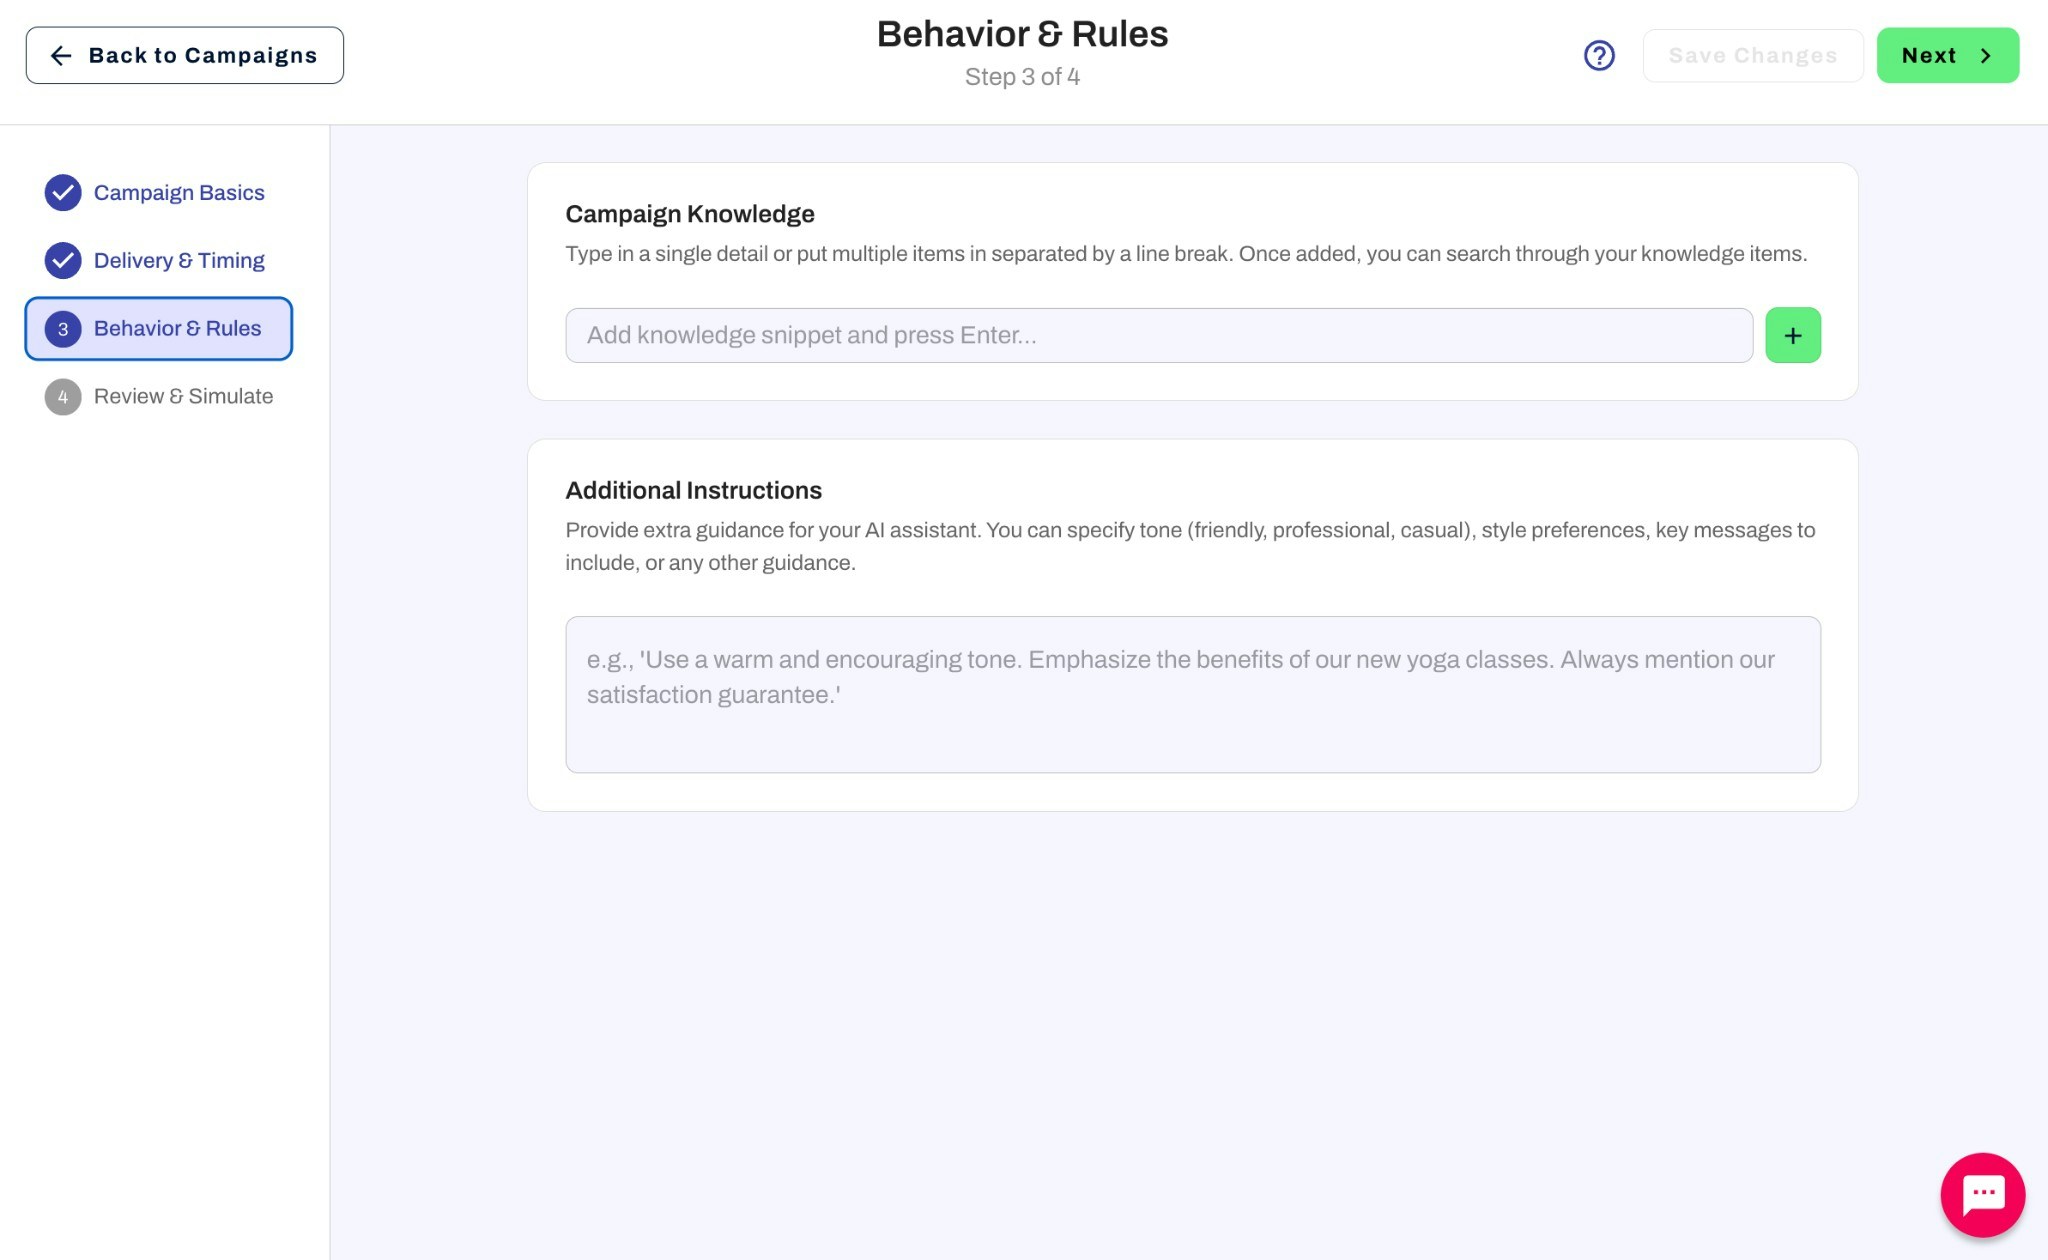 **Campaign Knowledge**: Add details that contacts may ask about during this campaign. Type in a single detail or add multiple items separated by line breaks. Once added, you can search through your knowledge items.
**Additional Instructions**: Provide extra guidance for your AI assistant. You can specify tone (friendly, professional, casual), style preferences, key messages to include, or any other guidance.
### Saving and simulation
After **Behavior & Rules**, save to finish—for example **Save and Manage Campaign**—or finish **Multi-Assistant Setup** when Multi-Assistant is on ([Multi-Assistant Campaigns](/campaigns/multi-assistant-campaigns)).
Use **Simulate campaign** from the campaign edit or management view to rehearse outreach. See [Managing Your Campaign](/campaigns/managing-your-campaign) once the campaign exists.
***
## Creating an Ongoing Campaign
Ongoing campaigns are designed for automated, multi-step outreach with scheduled follow-ups across one or more channels.
### Step 1: Campaign Basics
**Campaign Knowledge**: Add details that contacts may ask about during this campaign. Type in a single detail or add multiple items separated by line breaks. Once added, you can search through your knowledge items.
**Additional Instructions**: Provide extra guidance for your AI assistant. You can specify tone (friendly, professional, casual), style preferences, key messages to include, or any other guidance.
### Saving and simulation
After **Behavior & Rules**, save to finish—for example **Save and Manage Campaign**—or finish **Multi-Assistant Setup** when Multi-Assistant is on ([Multi-Assistant Campaigns](/campaigns/multi-assistant-campaigns)).
Use **Simulate campaign** from the campaign edit or management view to rehearse outreach. See [Managing Your Campaign](/campaigns/managing-your-campaign) once the campaign exists.
***
## Creating an Ongoing Campaign
Ongoing campaigns are designed for automated, multi-step outreach with scheduled follow-ups across one or more channels.
### Step 1: Campaign Basics
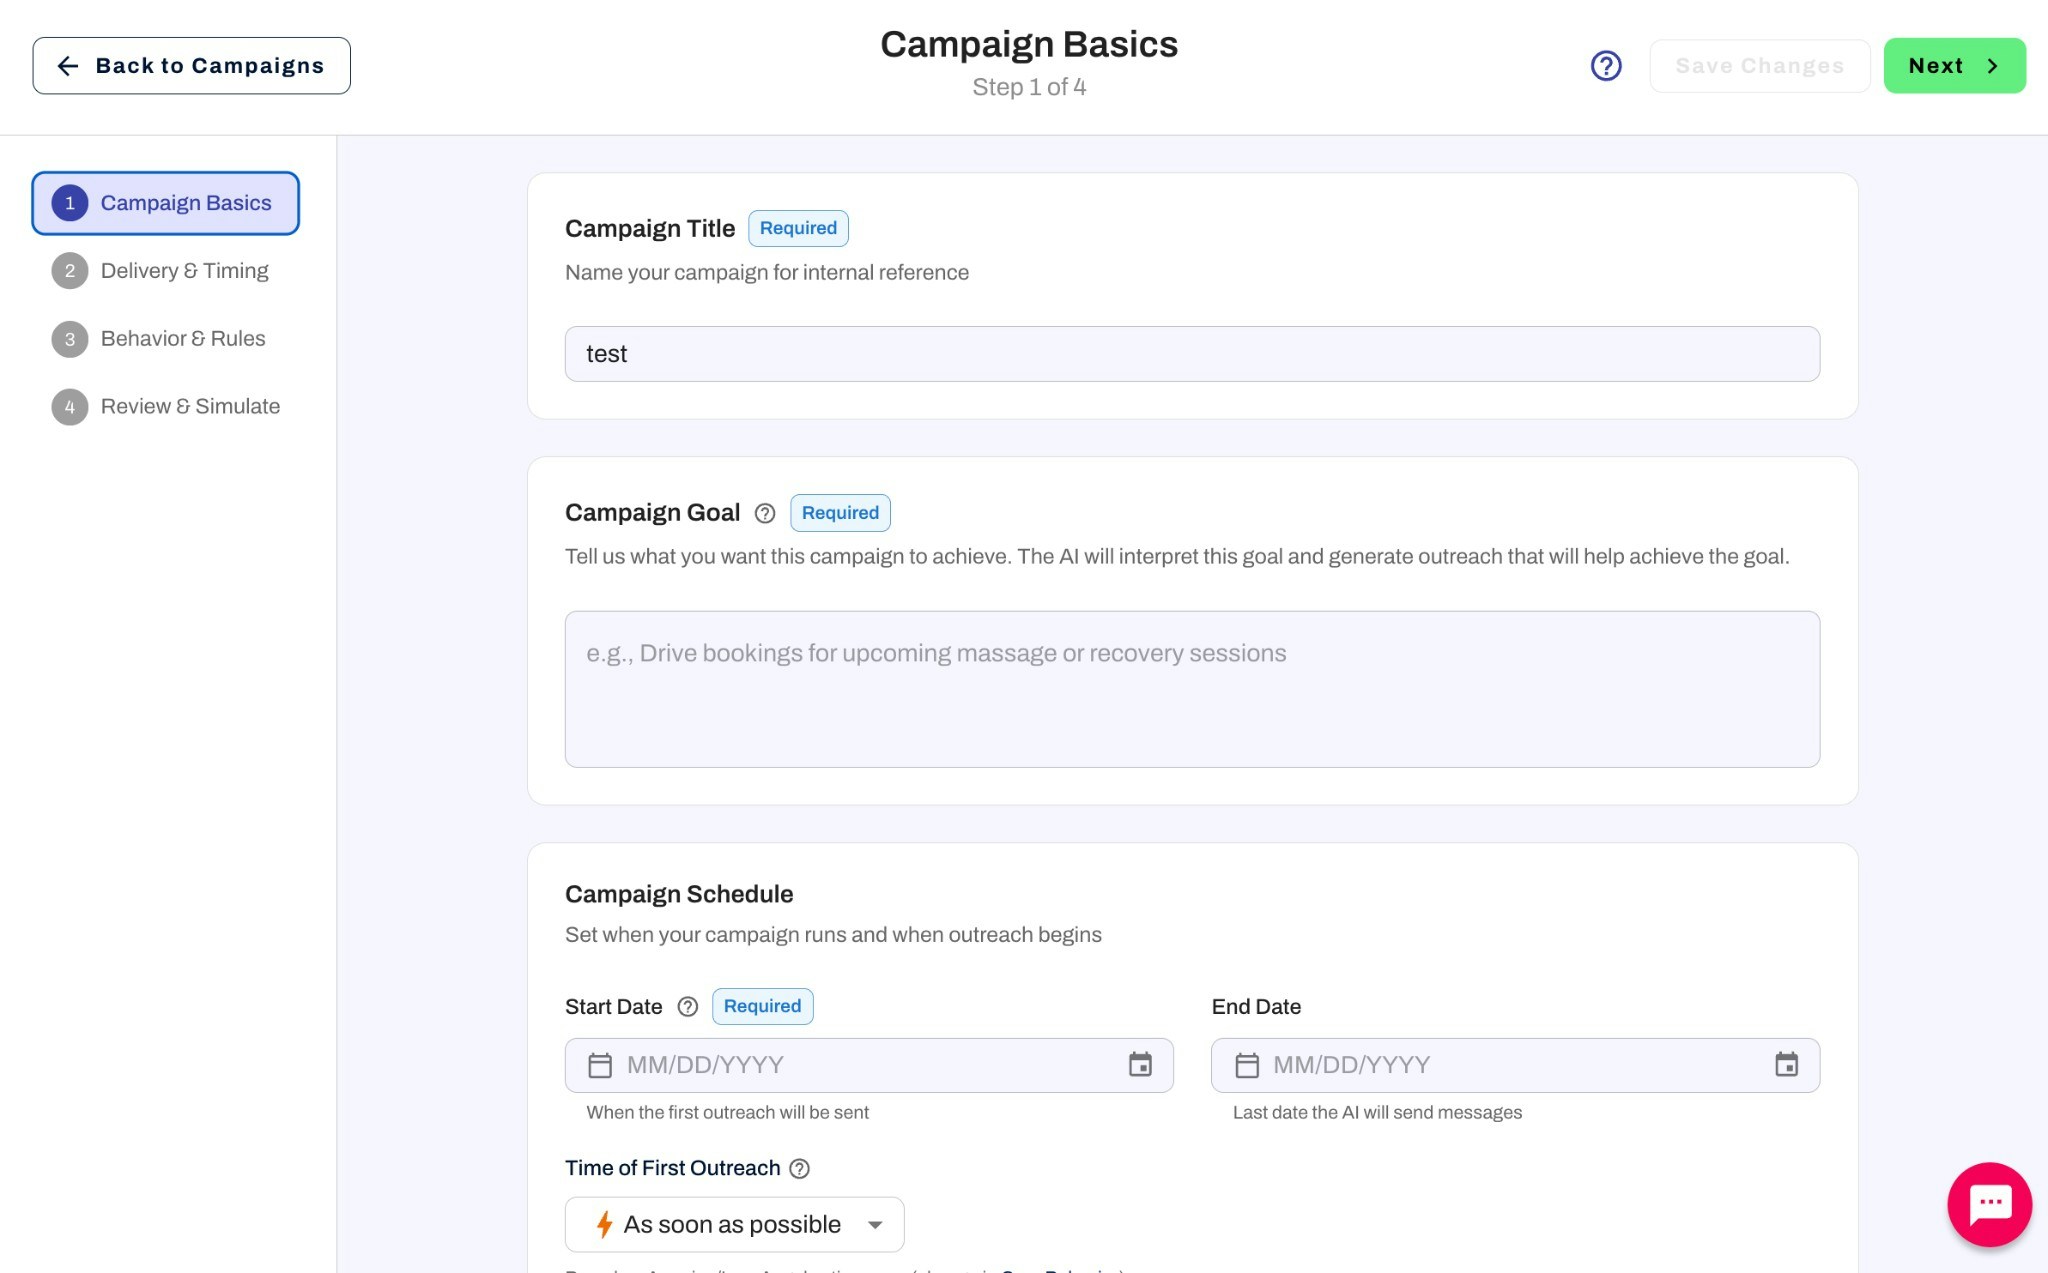 **Campaign Title** *(required)*: Your campaign name (set during creation, editable here).
**Campaign Goal** *(required)*: Describe what you want this campaign to achieve. The AI will use this goal to generate outreach that helps achieve it.
*Example:* "Drive bookings for upcoming massage or recovery sessions" or "Get members to upgrade to an unlimited plan during our summer sale event."
**Campaign Schedule**:
* **Start Date** *(required)*: When the first outreach will be sent (MM/DD/YYYY)
* **End Date**: Optional. If provided, this will be the last date the AI will send messages.
* **Time of First Outreach**: Specify when the first outreach should occur. Select a specific time or choose "As soon as possible." Time is based on the timezone set in Core Behavior.
### Step 2: Delivery & Timing
**Campaign Title** *(required)*: Your campaign name (set during creation, editable here).
**Campaign Goal** *(required)*: Describe what you want this campaign to achieve. The AI will use this goal to generate outreach that helps achieve it.
*Example:* "Drive bookings for upcoming massage or recovery sessions" or "Get members to upgrade to an unlimited plan during our summer sale event."
**Campaign Schedule**:
* **Start Date** *(required)*: When the first outreach will be sent (MM/DD/YYYY)
* **End Date**: Optional. If provided, this will be the last date the AI will send messages.
* **Time of First Outreach**: Specify when the first outreach should occur. Select a specific time or choose "As soon as possible." Time is based on the timezone set in Core Behavior.
### Step 2: Delivery & Timing
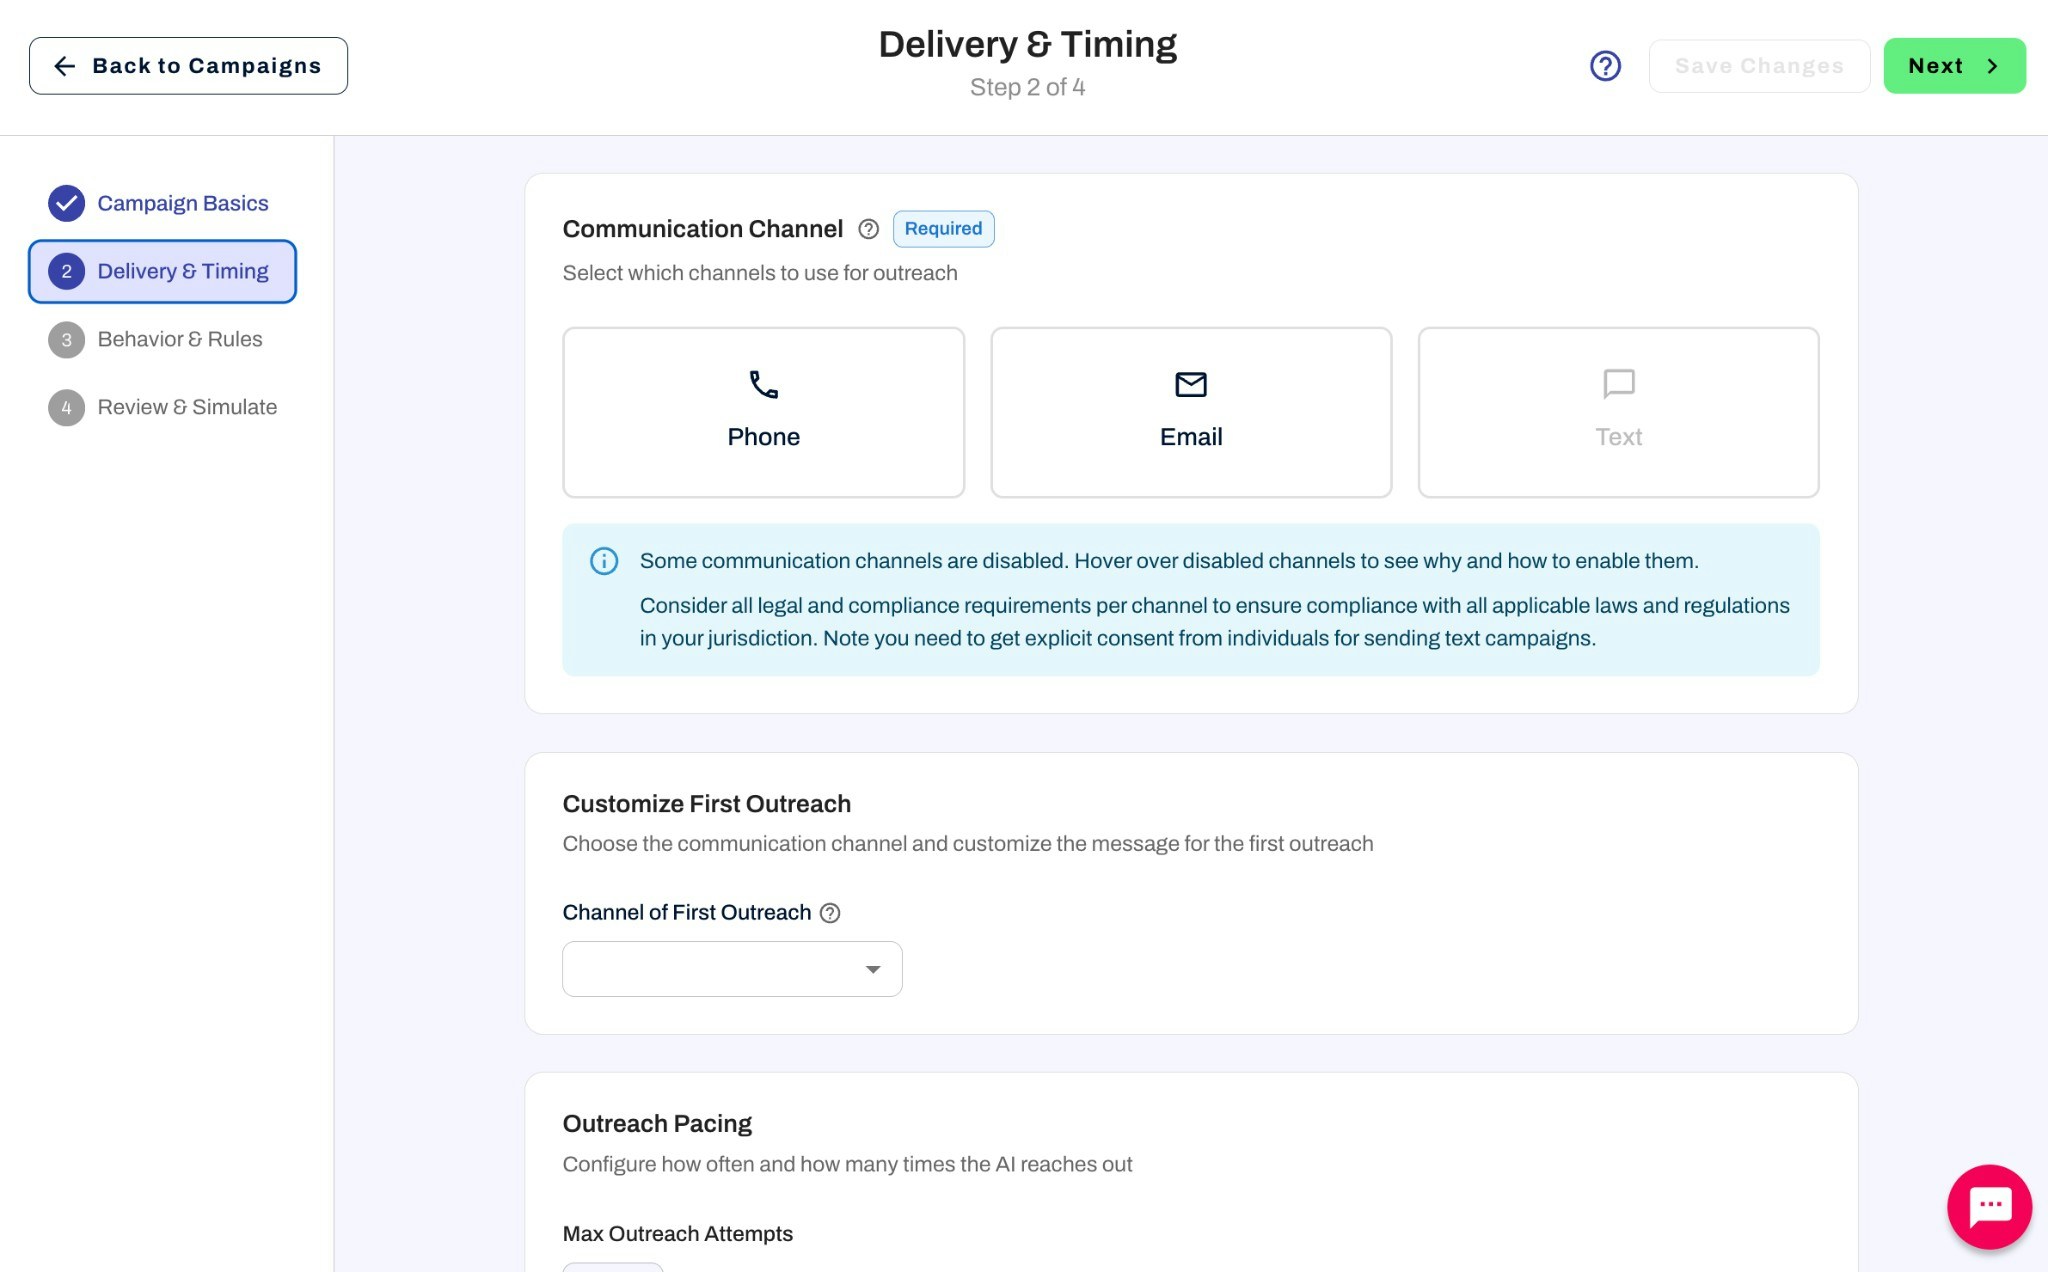 #### Communication Channel *(required)*
Select **one or more** channels for outreach: Phone, Email, and/or Text.
Some communication channels may be disabled. Hover over disabled channels to see why and how to enable them. Consider all legal and compliance requirements per channel to ensure compliance with all applicable laws and regulations in your jurisdiction. You need to get explicit consent from individuals for sending text campaigns.
#### Customize First Outreach
**Channel of First Outreach**: Choose which communication channel the AI should use for the first outreach to each contact.
#### Outreach Pacing
Configure how often and how many times the AI reaches out:
**Max Outreach Attempts**: Set the maximum number of times each contact can be messaged or called in this campaign (e.g., 3 attempts per contact before stopping).
**Follow-Up Frequency**: Choose how frequently the AI follows up with contacts:
| Frequency | Interval |
| ---------- | --------------------- |
| Aggressive | Every day |
| Moderate | Every 2 days |
| Balanced | Every 3–4 days |
| Relaxed | Every 7 days |
| Custom | Set your own interval |
### Step 3: Behavior & Rules
#### Communication Channel *(required)*
Select **one or more** channels for outreach: Phone, Email, and/or Text.
Some communication channels may be disabled. Hover over disabled channels to see why and how to enable them. Consider all legal and compliance requirements per channel to ensure compliance with all applicable laws and regulations in your jurisdiction. You need to get explicit consent from individuals for sending text campaigns.
#### Customize First Outreach
**Channel of First Outreach**: Choose which communication channel the AI should use for the first outreach to each contact.
#### Outreach Pacing
Configure how often and how many times the AI reaches out:
**Max Outreach Attempts**: Set the maximum number of times each contact can be messaged or called in this campaign (e.g., 3 attempts per contact before stopping).
**Follow-Up Frequency**: Choose how frequently the AI follows up with contacts:
| Frequency | Interval |
| ---------- | --------------------- |
| Aggressive | Every day |
| Moderate | Every 2 days |
| Balanced | Every 3–4 days |
| Relaxed | Every 7 days |
| Custom | Set your own interval |
### Step 3: Behavior & Rules
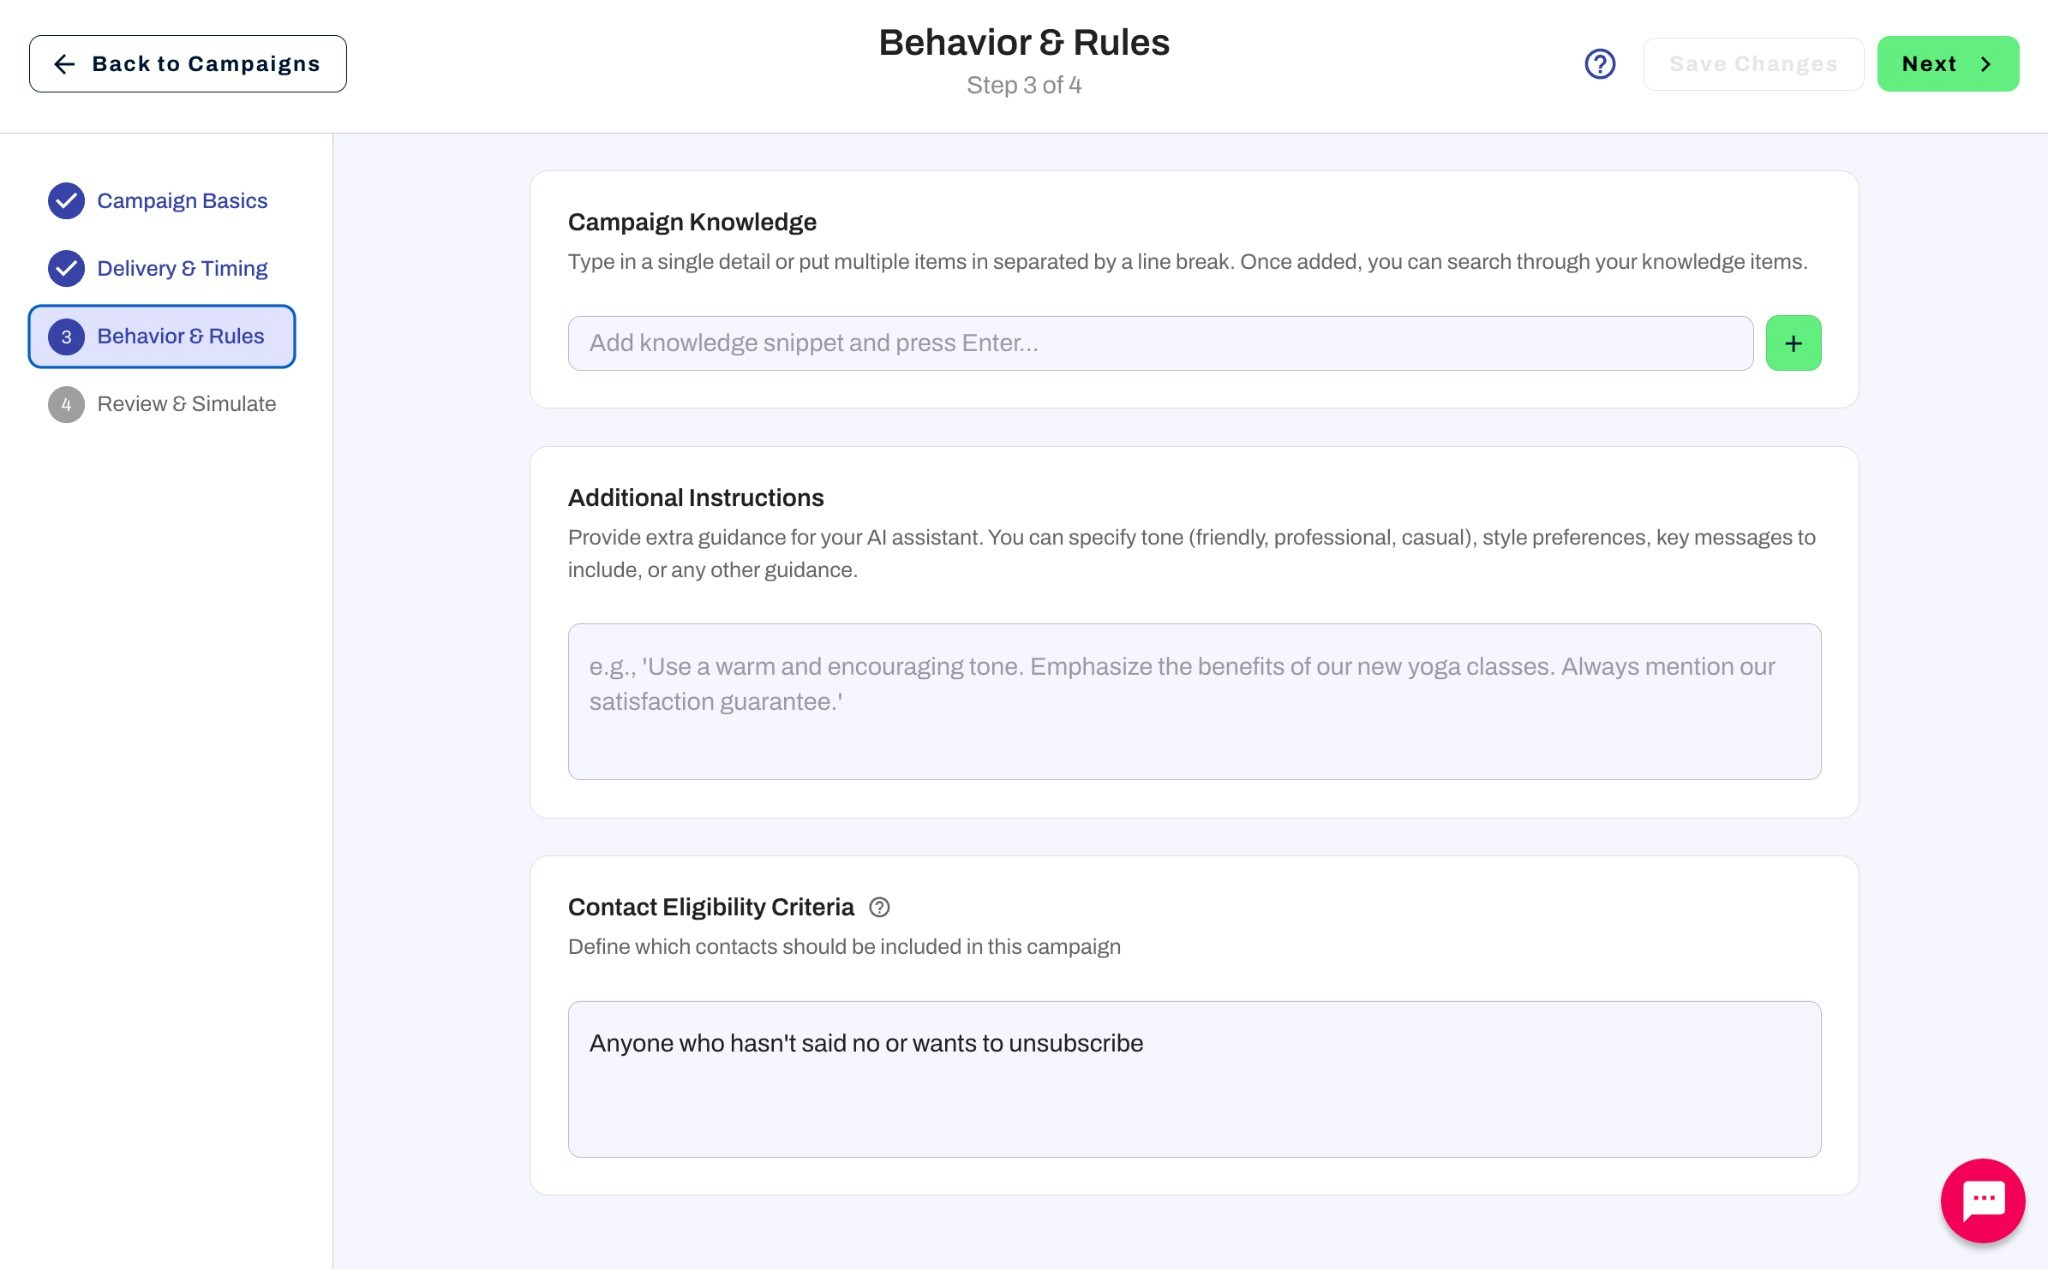 **Campaign Knowledge**: Add details that contacts may ask about during this campaign. Type in a single detail or add multiple items separated by line breaks. Once added, you can search through your knowledge items.
**Additional Instructions**: Provide extra guidance for your AI assistant. You can specify tone (friendly, professional, casual), style preferences, key messages to include, or any other guidance.
**Contact Eligibility Criteria**: Define which contacts should be included in this campaign. Describe criteria for determining which contacts qualify for continued outreach.
*Example:* "Anyone who hasn't said no or wants to unsubscribe" or "Contact is an active member and is not in the unlimited plan."
### Saving and simulation
After **Behavior & Rules**, save to finish—for example **Save and Manage Campaign**—or finish **Multi-Assistant Setup** when Multi-Assistant is on ([Multi-Assistant Campaigns](/campaigns/multi-assistant-campaigns)).
Use **Simulate campaign** from the campaign edit or management view to rehearse outreach. See [Managing Your Campaign](/campaigns/managing-your-campaign) once the campaign exists.
***
## Next Steps
After creating your campaign, you'll need to add contacts and manage it. See [Managing Your Campaign](/campaigns/managing-your-campaign) for details on contacts, statuses, manual review, and reporting.
**Campaign Knowledge**: Add details that contacts may ask about during this campaign. Type in a single detail or add multiple items separated by line breaks. Once added, you can search through your knowledge items.
**Additional Instructions**: Provide extra guidance for your AI assistant. You can specify tone (friendly, professional, casual), style preferences, key messages to include, or any other guidance.
**Contact Eligibility Criteria**: Define which contacts should be included in this campaign. Describe criteria for determining which contacts qualify for continued outreach.
*Example:* "Anyone who hasn't said no or wants to unsubscribe" or "Contact is an active member and is not in the unlimited plan."
### Saving and simulation
After **Behavior & Rules**, save to finish—for example **Save and Manage Campaign**—or finish **Multi-Assistant Setup** when Multi-Assistant is on ([Multi-Assistant Campaigns](/campaigns/multi-assistant-campaigns)).
Use **Simulate campaign** from the campaign edit or management view to rehearse outreach. See [Managing Your Campaign](/campaigns/managing-your-campaign) once the campaign exists.
***
## Next Steps
After creating your campaign, you'll need to add contacts and manage it. See [Managing Your Campaign](/campaigns/managing-your-campaign) for details on contacts, statuses, manual review, and reporting.